
Mission Control: The Web UI
Contents
- A quick orientation
- Installation
- Access control
- Configuration
- Monitoring jobs
- Managing a job
- Recovering a failed batch job
- Monitoring workers
- Managing servers
- Managing directory monitors
Rocket Job Mission Control is the web interface for managing and monitoring Rocket Job. It is where operators watch what the cluster is doing, retry or abort work, drain servers for a deploy, inspect and repair failed batch jobs, and manage directory monitoring entries, all without writing or deploying any code.
It ships as a separate gem,
rocketjob_mission_control,
so the web UI and its Rails dependencies are not loaded everywhere Rocket Job jobs are
defined or run. Workers stay lean, and the console runs wherever it is convenient to host a
small Rails app.
A quick orientation
If you are new to Rocket Job, a handful of terms show up throughout this interface:
- A Job is a unit of work. It moves through a lifecycle of states (queued, running, completed, failed, and so on) that Mission Control groups into tabs. See the Programmers Guide.
- A Batch Job splits a large amount of data into many small slices that are processed in parallel and independently. A single bad record fails only its slice, not the whole job, which is what makes the recovery tools below possible. See Batch Processing.
- A Server is one running Rocket Job process. Each server runs one or more Workers, the threads that actually pull jobs off the queue and process them. See Architecture.
- A Dirmon Entry is a rule that watches a directory and starts a job whenever a matching file arrives. See the Dirmon guide.
The top navigation bar mirrors these concepts with four sections: Jobs, Servers, Workers, and Directory Monitoring. The rest of this page walks through each one.
Installation
Mission Control is a Rails engine. Mount it into a new or existing Rails application.
Add it to the Gemfile:
gem "rocketjob_mission_control", "~> 6.0"
Install it:
bundle install
Mount the engine in config/routes.rb, pointing it at whatever path you want it served
from:
Rails.application.routes.draw do
  mount RocketJobMissionControl::Engine => "rocketjob"
end
The application that hosts Mission Control needs the same Mongoid configuration as the
rest of the cluster (the rocketjob and rocketjob_slices clients) so that it reads and
writes the same jobs and slices. See Installation for the Mongoid
setup.
Because it only needs railties and not a full Rails stack, Mission Control can be mounted
into a minimal app dedicated to operations. It exposes destructive actions (aborting jobs,
stopping servers, editing slice data), so put it behind your own authentication and
authorization before exposing it outside a trusted network. The next section covers the
built-in authorization.
Access control
Mission Control authenticates nothing itself; the host app is responsible for identifying the user. What Mission Control does provide is fine-grained authorization: deciding which of its actions a given user is allowed to perform.
Authorization is built on the access-granted gem, a lightweight, policy-based, role-driven authorization library. A few of its concepts are worth knowing before tuning the rules:
- Policy. A single policy object holds all the rules. Mission Control ships one,
RocketJobMissionControl::AccessPolicy, whoseconfiguremethod defines every role. - Roles. Permissions are grouped into named roles rather than scattered through conditionals. A user is granted one or more roles and inherits the permissions those roles allow.
- Whitelist model. Rules say what a role can do; anything not explicitly granted is denied. There are no sprawling “allow this, but not that” exceptions to reason about.
- Priority ordering. Roles are evaluated top to bottom. The most privileged role sits at the top, and the first role that grants a permission wins, so checks stay fast and predictable.
- Conditional permissions. A permission can carry a block that further scopes it, for example restricting a user to acting only on their own jobs.
The default roles
Mission Control defines seven roles over the RocketJob::Job, RocketJob::DirmonEntry,
RocketJob::Server, and RocketJob::Worker documents:
| Role | Grants |
|---|---|
admin |
Create and destroy jobs; destroy Dirmon entries. |
editor |
View, edit, and update the data inside a batch job’s slices, including encrypted records. |
operator |
Stop, kill, pause, resume, and destroy servers; destroy zombies; request thread dumps. |
manager |
Edit, pause, resume, retry, abort, fail, update, and run jobs now. |
dirmon |
Create, edit, update, copy, replicate, enable, and disable Dirmon entries. |
user |
Edit, pause, resume, retry, abort, and update jobs, but only the user’s own jobs (where the job’s login matches). |
view |
Read-only access to jobs, Dirmon entries, servers, and workers. |
Roles are hierarchical. They are ordered from most to least privileged (admin,
editor, operator, manager, dirmon, user, view), and granting a role also grants
every role below it. So an admin can do everything, a manager also gets dirmon, user,
and view permissions, and a view user gets read-only access and nothing more.
The user role is special: its permissions are scoped by a login, so a user granted that
role can only act on jobs whose login matches their own. Supply the current user’s login
from the configuration callback described below.
When no authorization is configured, every request is treated as a full admin. This
keeps development friction-free, and makes wiring up your own authorization an opt-in step.
Configure it before exposing Mission Control beyond a trusted network.
Configuration
Authorization is wired up with a single callback in an initializer in the host application,
for example config/initializers/rocket_job_mission_control.rb:
RocketJobMissionControl::Engine.config.rocket_job_mission_control.authorization_callback =
  lambda do
    {
      roles: current_user.rocket_job_roles, # e.g. [:manager, :dirmon]
      login: current_user.email
    }
  end
The callback:
- Returns a hash with
roles(an array of role names from the table above) and, optionally, aloginused to scope theuserrole. - Is evaluated in the controller instance (
instance_exec), so it can readsession,request, and anycurrent_user-style helper your authentication layer provides. This is how per-request, per-user roles are computed. - Returning an empty
rolesarray grants no permissions (read nothing, do nothing), which is the safe default for an unauthenticated request.
Supplying an unknown role name raises an ArgumentError, so typos surface immediately rather
than silently granting or denying access.
To change the permissions themselves rather than who receives which role, supply your own
policy class. Define a class that includes AccessGranted::Policy (subclassing the shipped
RocketJobMissionControl::AccessPolicy is the easiest starting point) and point the engine
at it:
class MyAccessPolicy < RocketJobMissionControl::AccessPolicy
  def configure
    super # keep the built-in roles, then add or override below

    role :auditor do
      can :read, RocketJob::Job
    end
  end
end

RocketJobMissionControl::Engine.config.rocket_job_mission_control.access_policy_class =
  MyAccessPolicy
access_policy_class accepts either the class itself or a String naming it (for example
"MyAccessPolicy"), which avoids autoloading the class too early from an initializer. When
it is not set, Mission Control uses RocketJobMissionControl::AccessPolicy. Because
access-granted is a plain authorization library, the same role/can API shown in the
shipped policy is all a custom policy needs.
Monitoring jobs
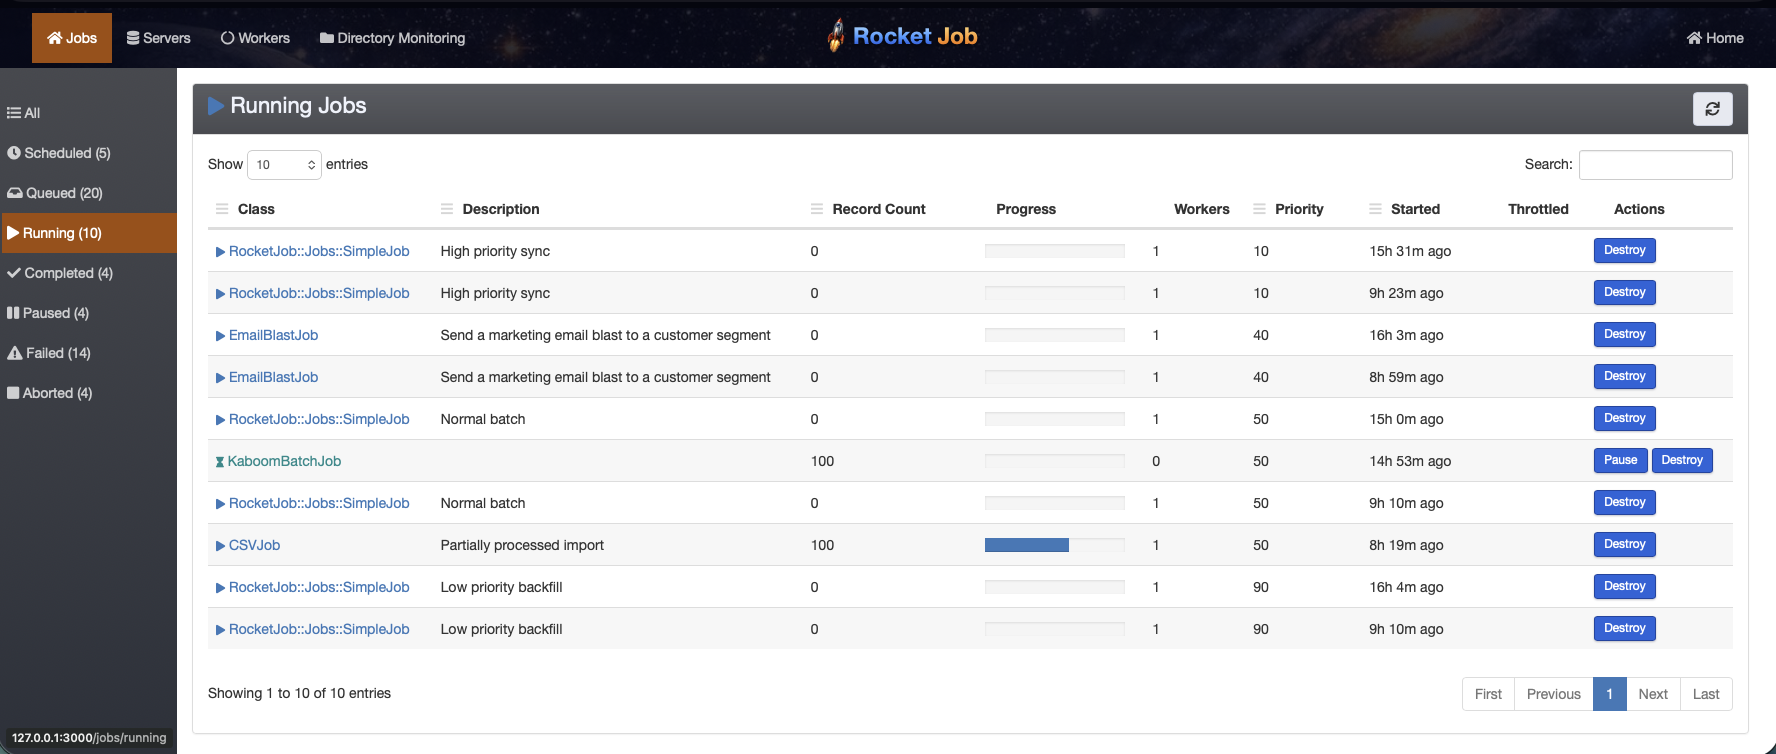
The interface opens on the list of running jobs, newest first. Each entry shows:
- The class name of the job.
- An icon indicating the job’s state.
- A duration that means different things depending on state:
- Completed: how long the job took to run.
- Queued: how long it has been waiting.
- Running: how long it has been processing.
- Failed or aborted: how long it ran before it stopped.
- For running jobs, a progress bar showing percent complete.
Jobs are grouped by state, each on its own tab in the left sidebar:
-
Running is the default view.
-
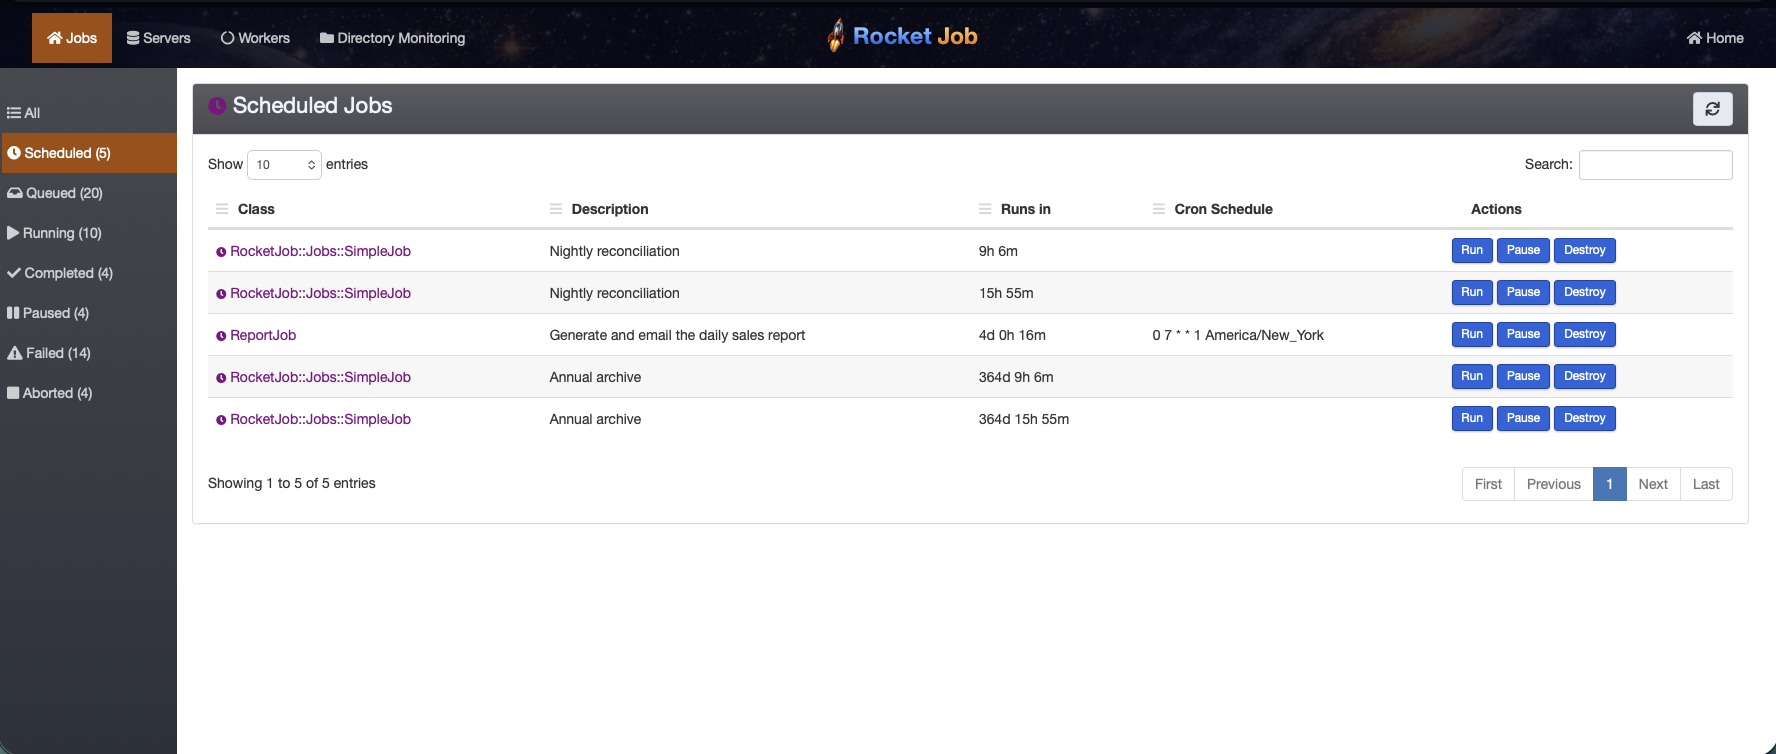
Scheduled lists jobs set to run in the future, including recurring Cron jobs. Select Run on any scheduled job to run it immediately instead of waiting for its next scheduled time.
-
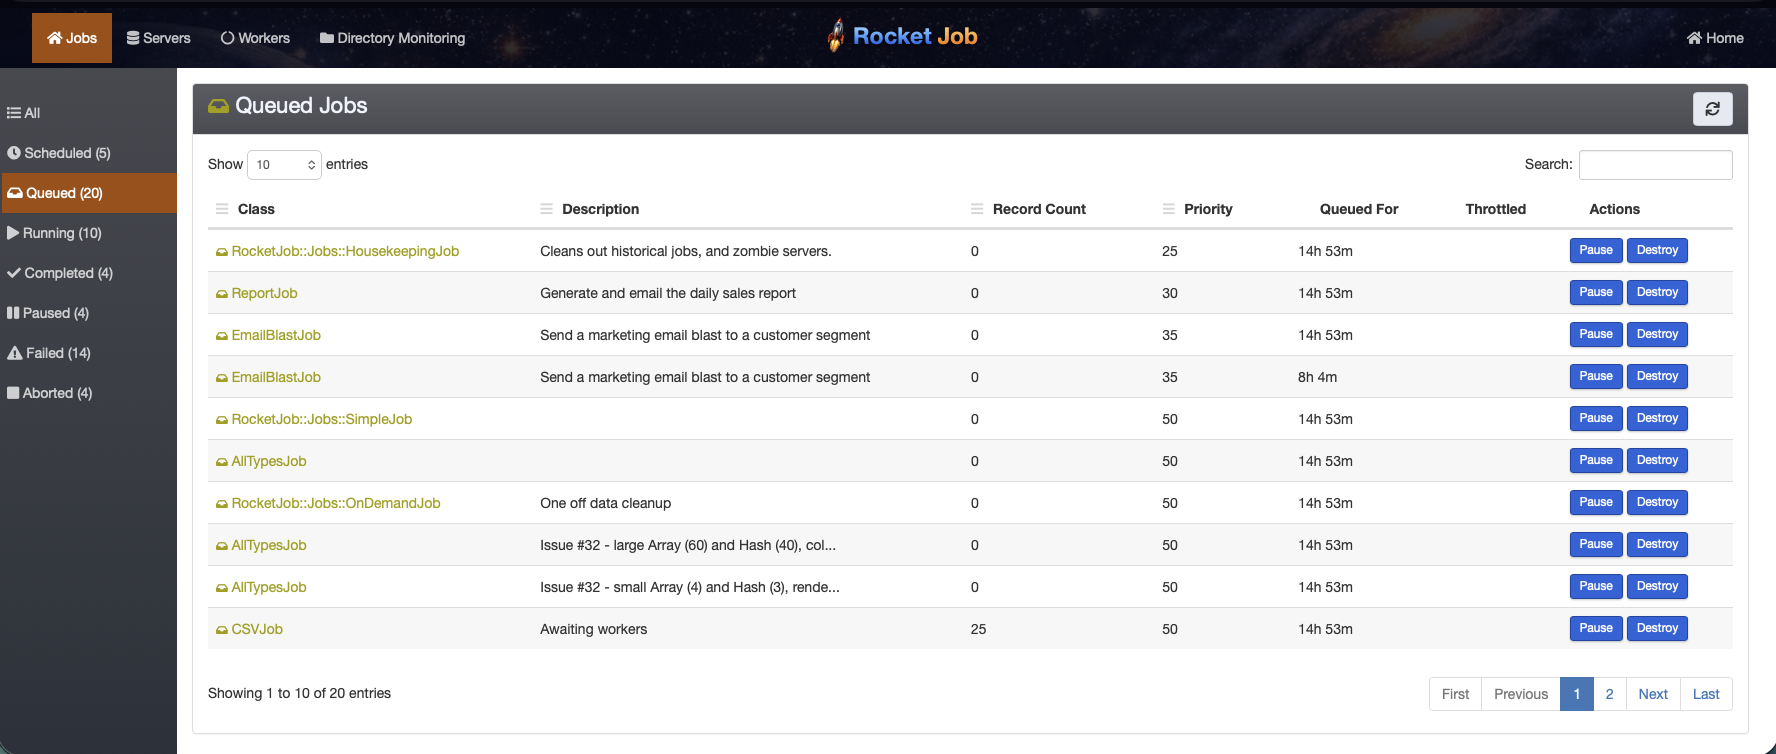
Queued lists jobs waiting for a free worker.
-
Completed lists finished jobs. Only jobs with
destroy_on_complete == falseare kept and shown here; by default completed jobs delete themselves.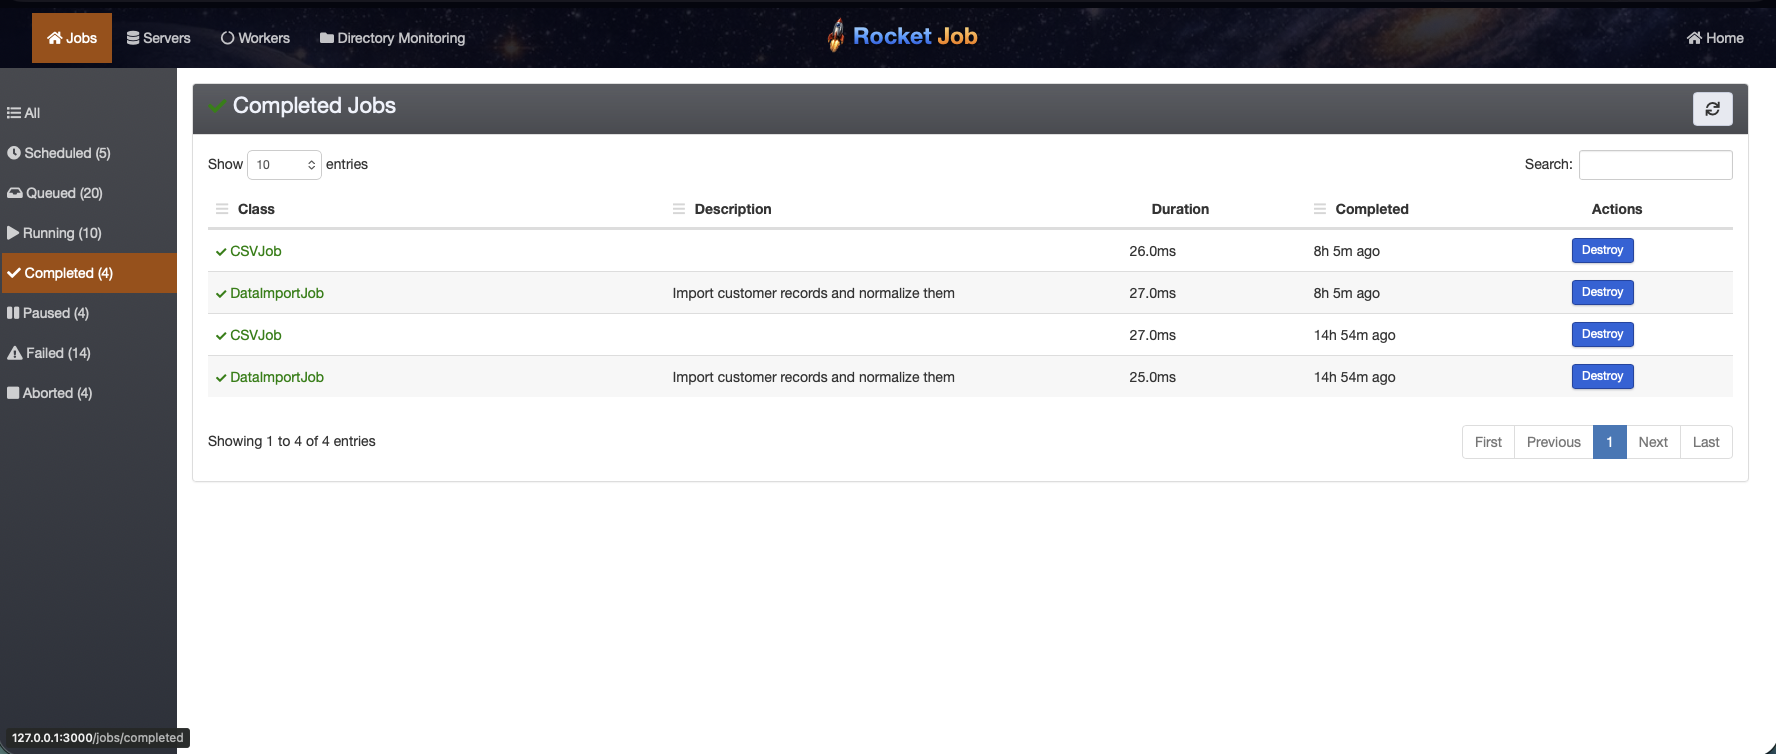
-
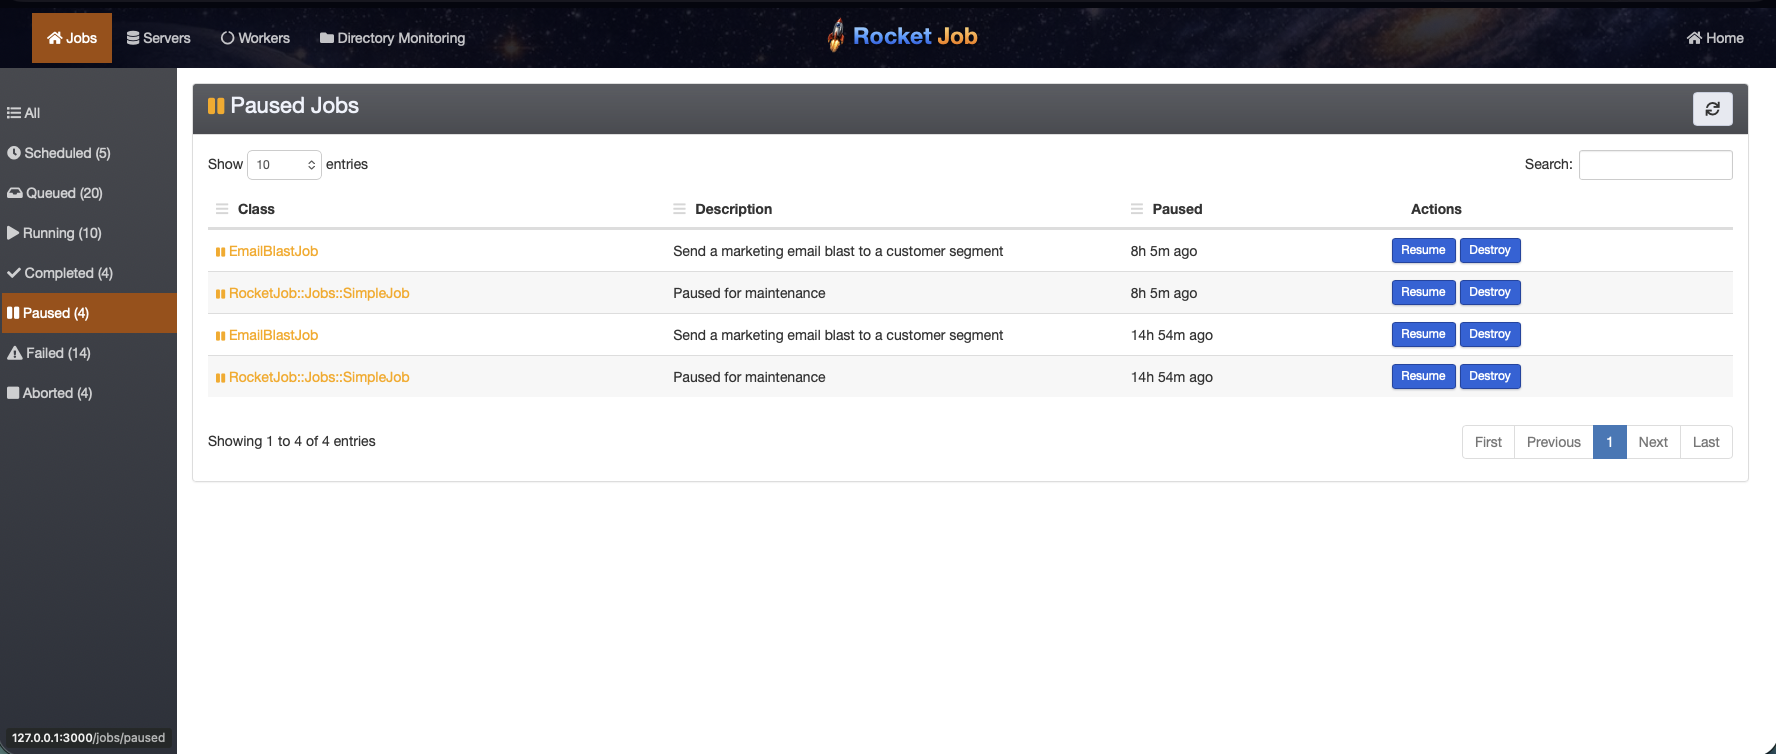
Paused lists jobs whose processing has been temporarily stopped.
-
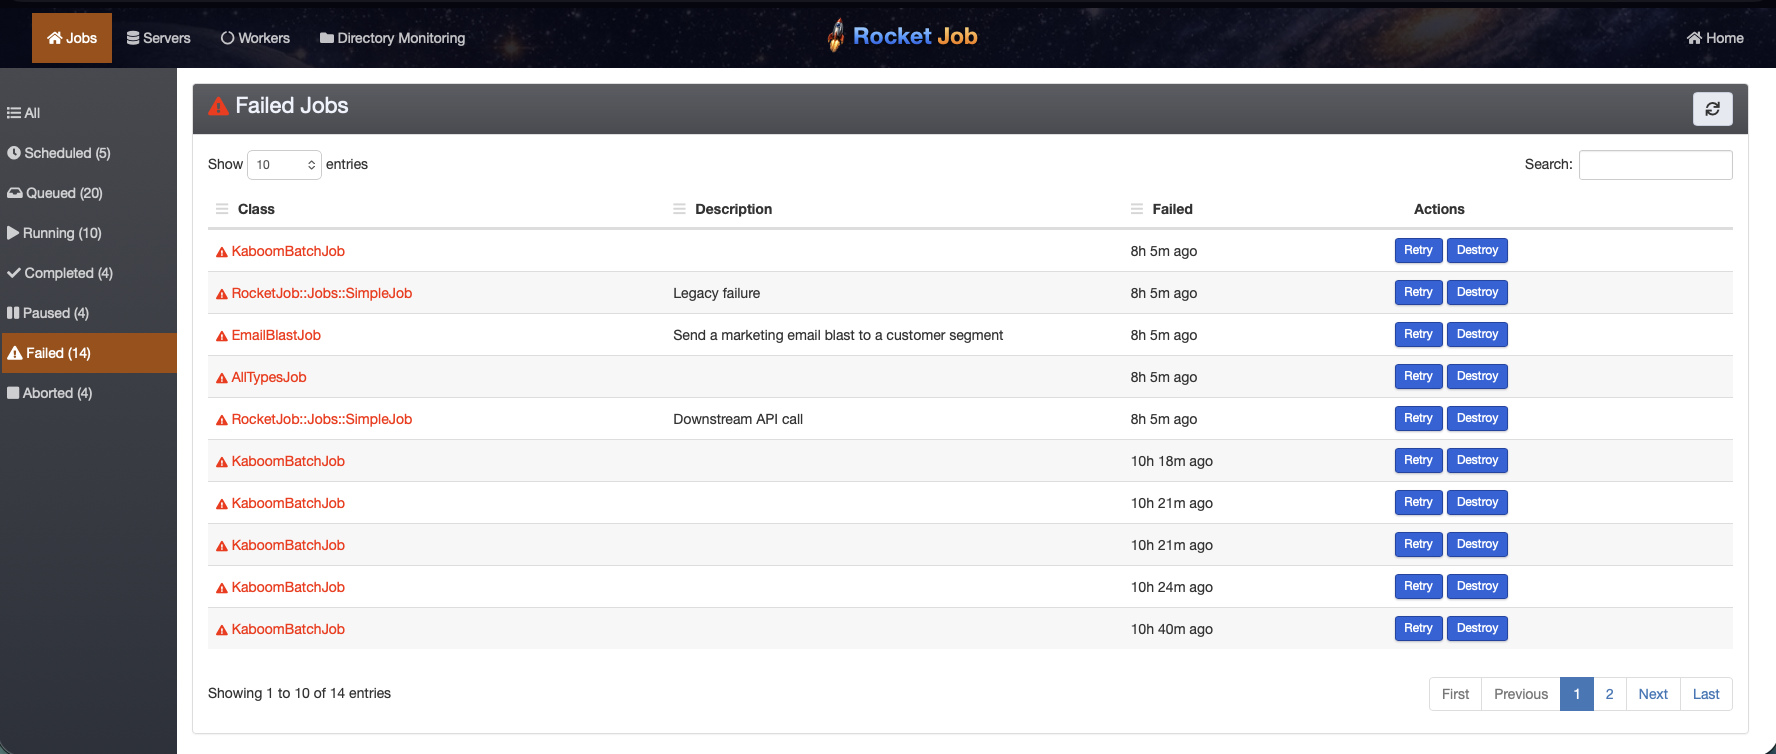
Failed lists jobs that raised an exception. The failure, including the backtrace, is recorded on the job so it can be inspected and retried.
-
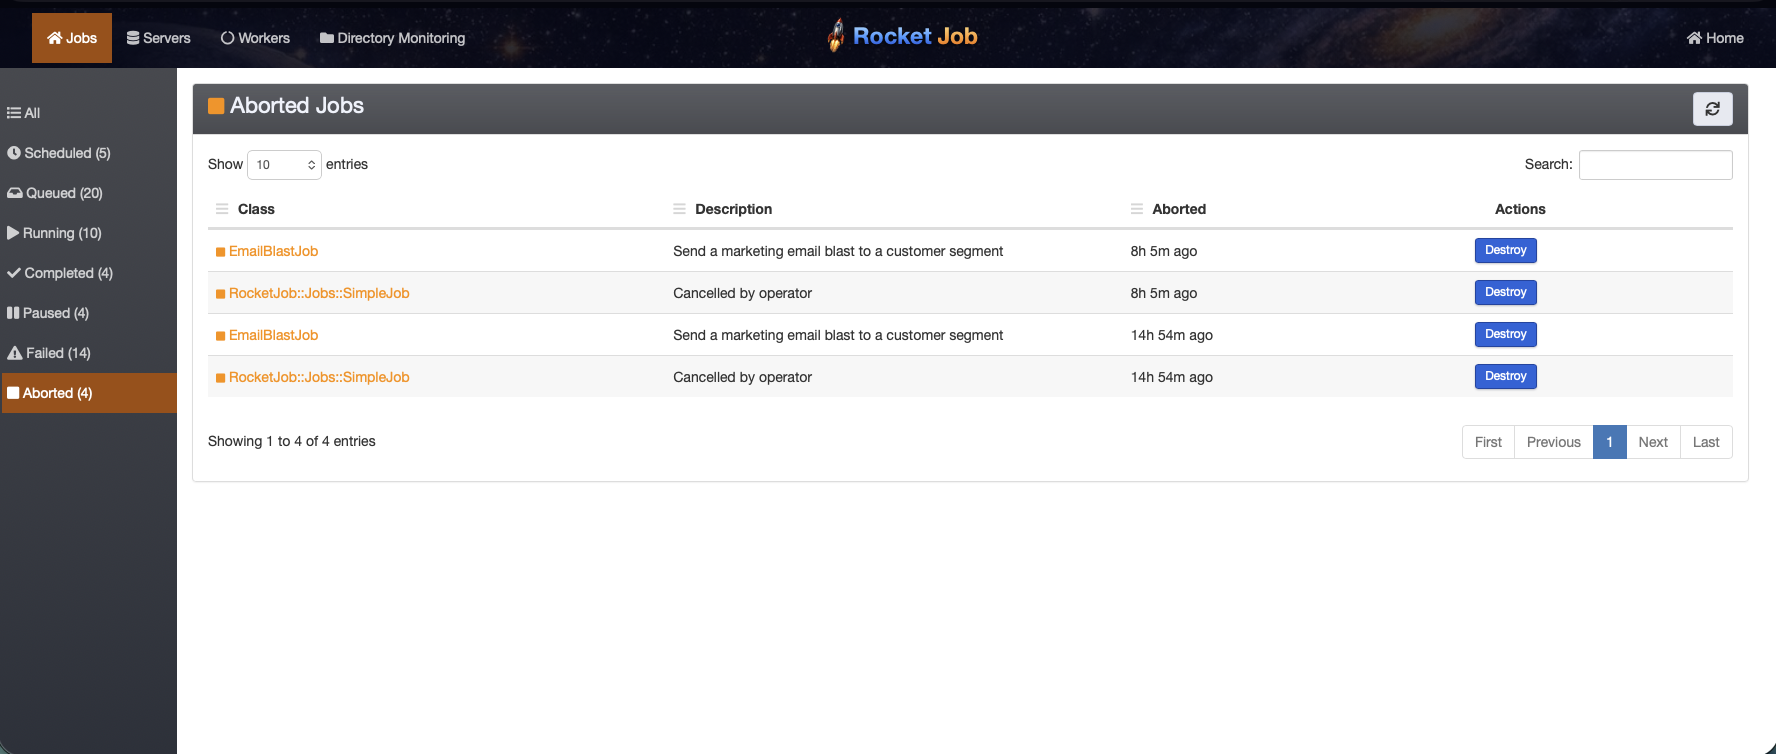
Aborted lists jobs that were stopped and cannot be retried.
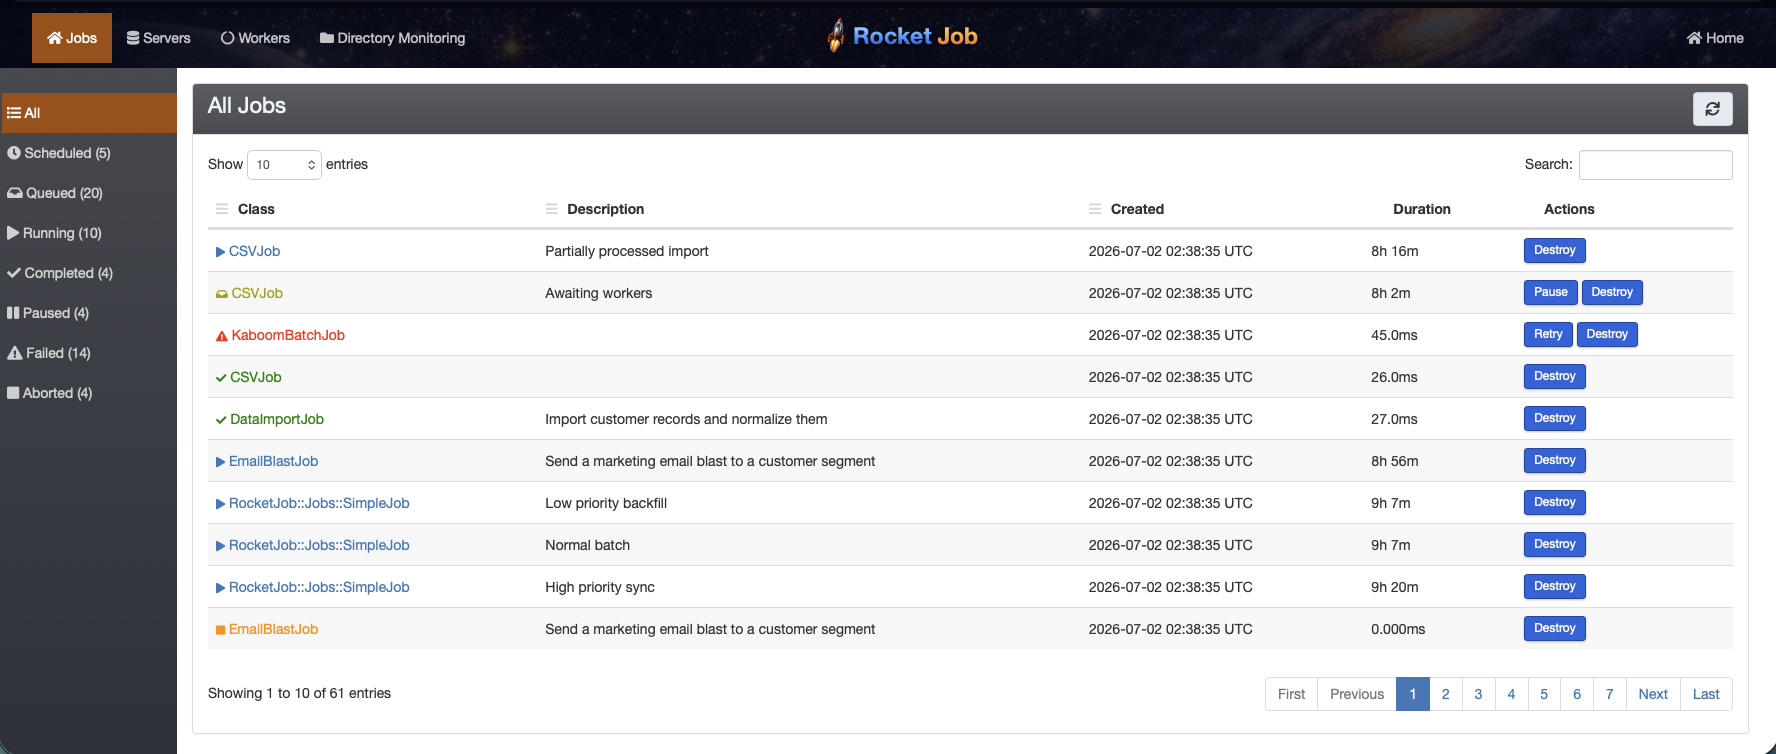
The All tab lists every job regardless of state, with a search box for finding a specific job by class or description. The valid actions for each job (Retry, Pause, Destroy, and so on) are available inline, so common operations can be done without opening the job.
Managing a job
Select any job to open its detail page. It shows the job’s current state, its fields and timing, and the actions that are valid for its current state. For a batch job, the Details panel also shows the record count, progress, estimated time remaining, and a Slices bar that breaks the work down into queued, active, failed, and completed slices at a glance.
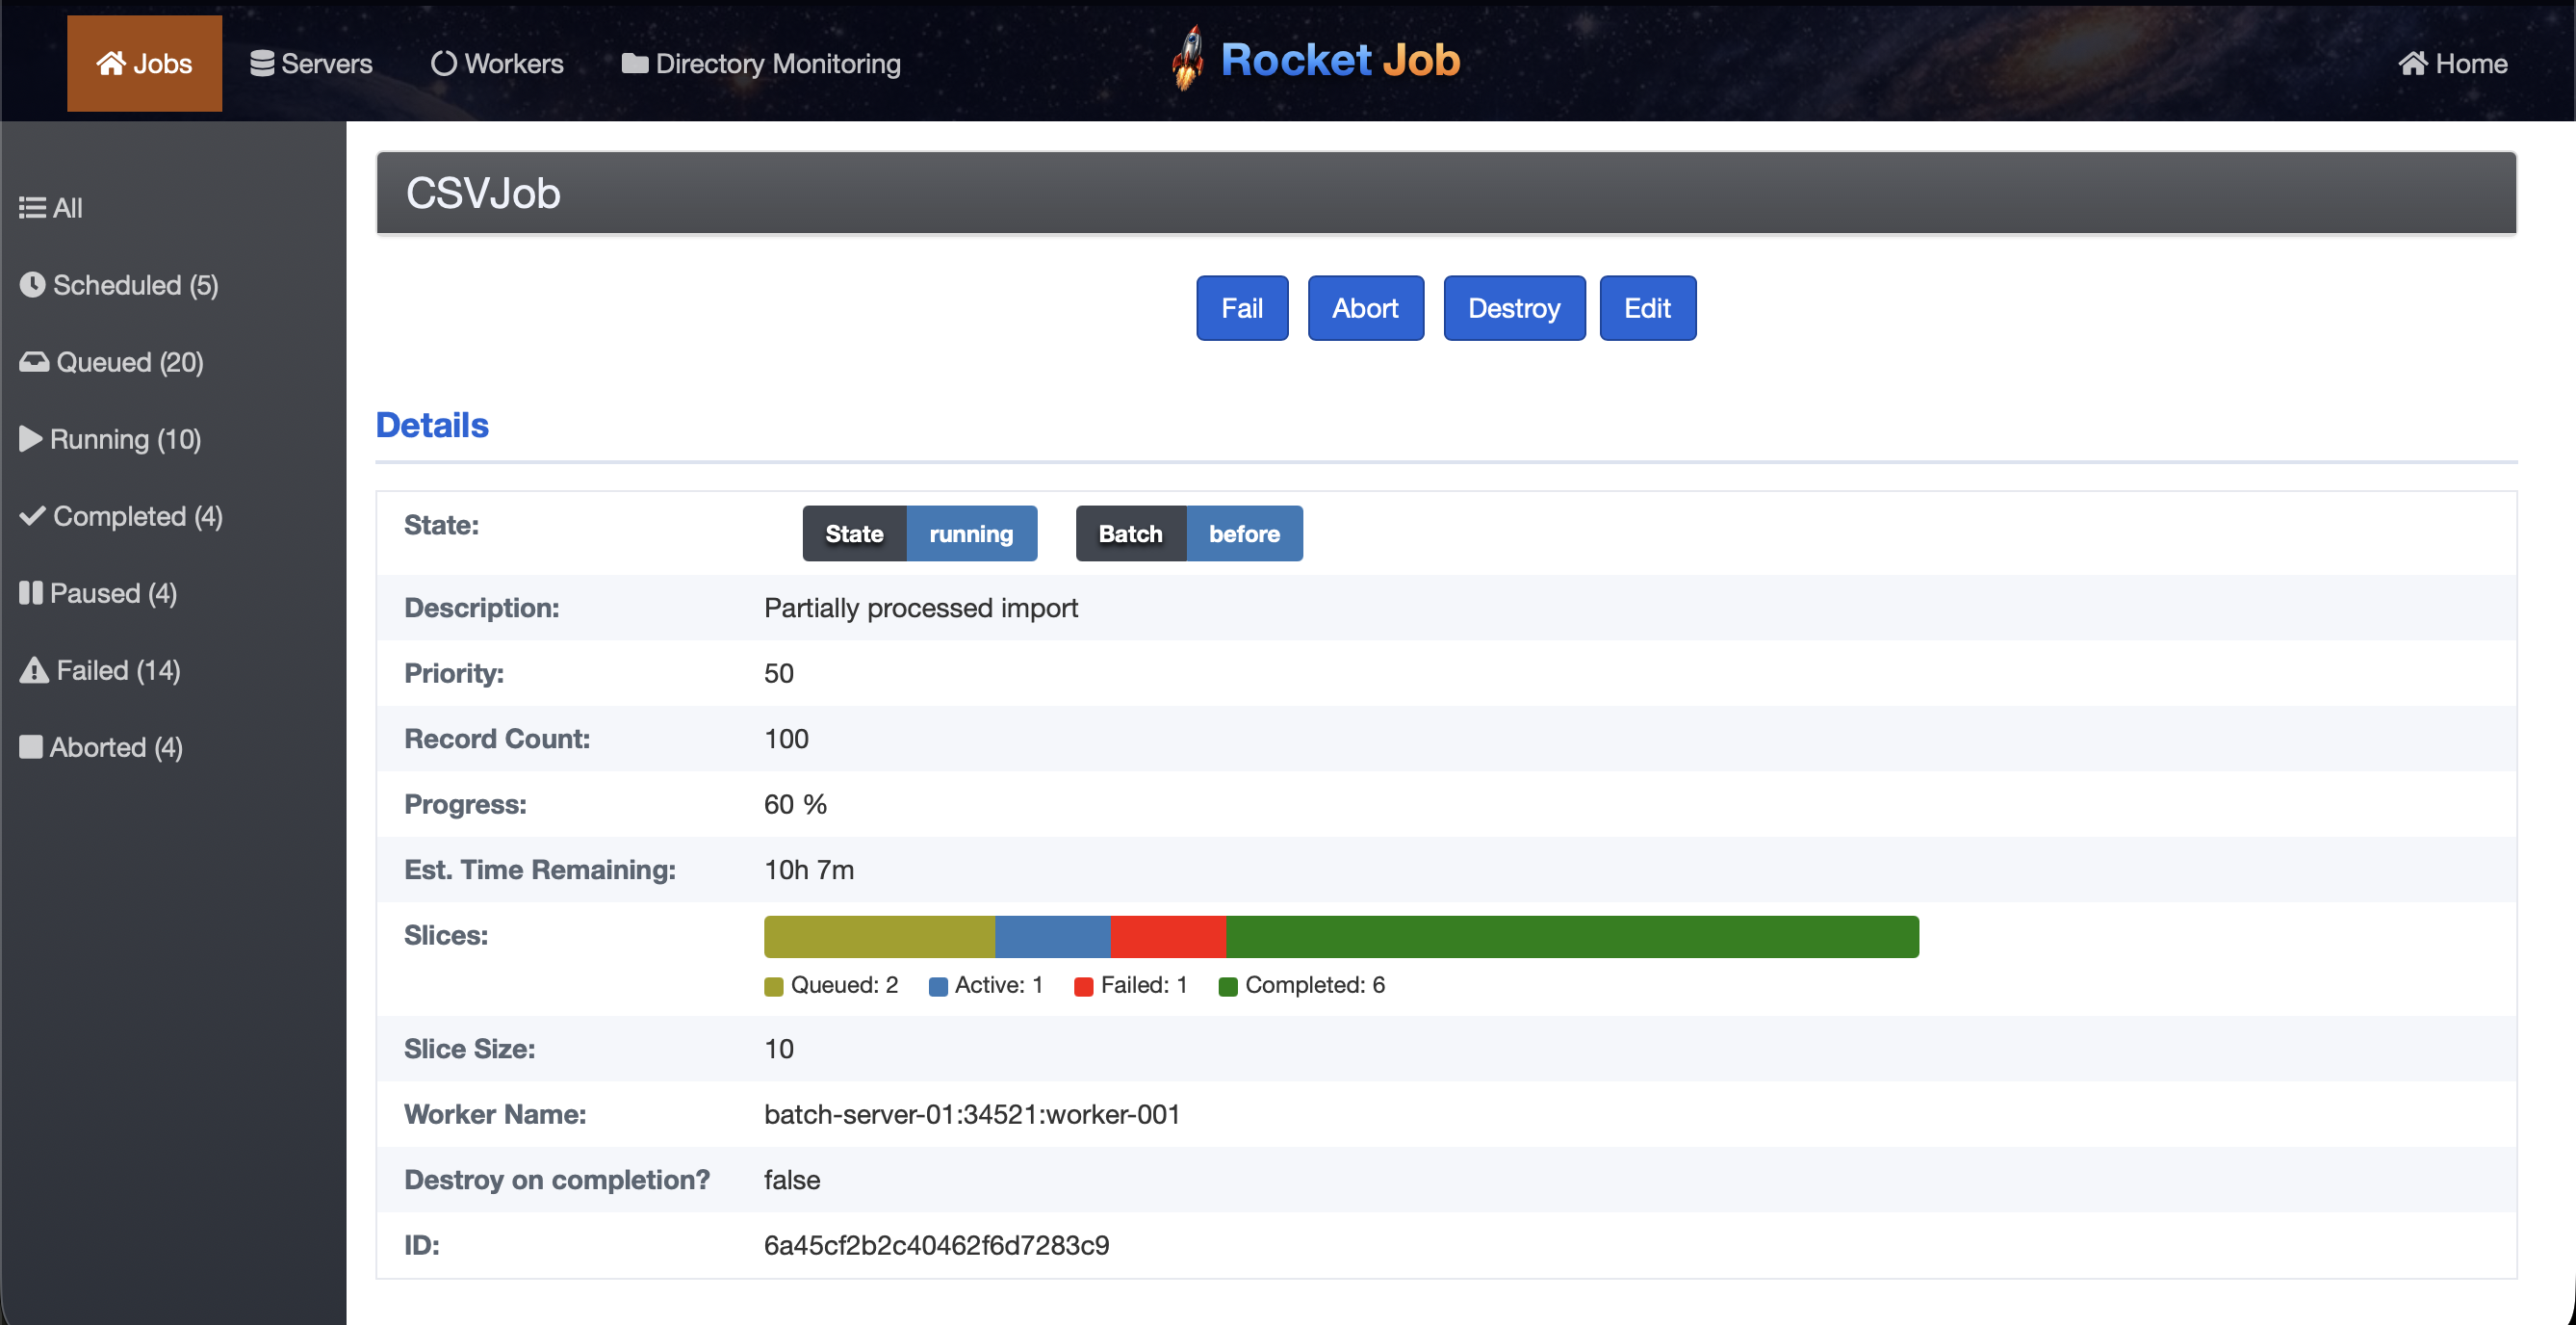
The available actions are:
- Retry restarts a failed job from where it left off. For batch jobs only the unprocessed and failed slices are run again, so retrying a large job does not reprocess records that already succeeded.
- Pause temporarily stops a running or queued job; it resumes only when Resume is
selected. Batch jobs can be paused mid-flight because they are pre-empted between slices.
A simple (non-batch) job is only checked between runs, so pausing one does not interrupt a
#performthat is already in progress. - Resume continues a paused job.
- Fail stops a running or queued job and marks it failed. A failed job can be retried later.
- Abort stops a running or queued job permanently; an aborted job cannot be retried. Aborting or failing a batch job cleans up its input and output slice collections.
- Destroy removes the job from the system entirely.
A failed job shows the captured exception so the cause can be diagnosed before retrying. The Slices bar turns solid red when every slice has failed, which is a quick signal that the failure is systemic rather than caused by a few bad records.
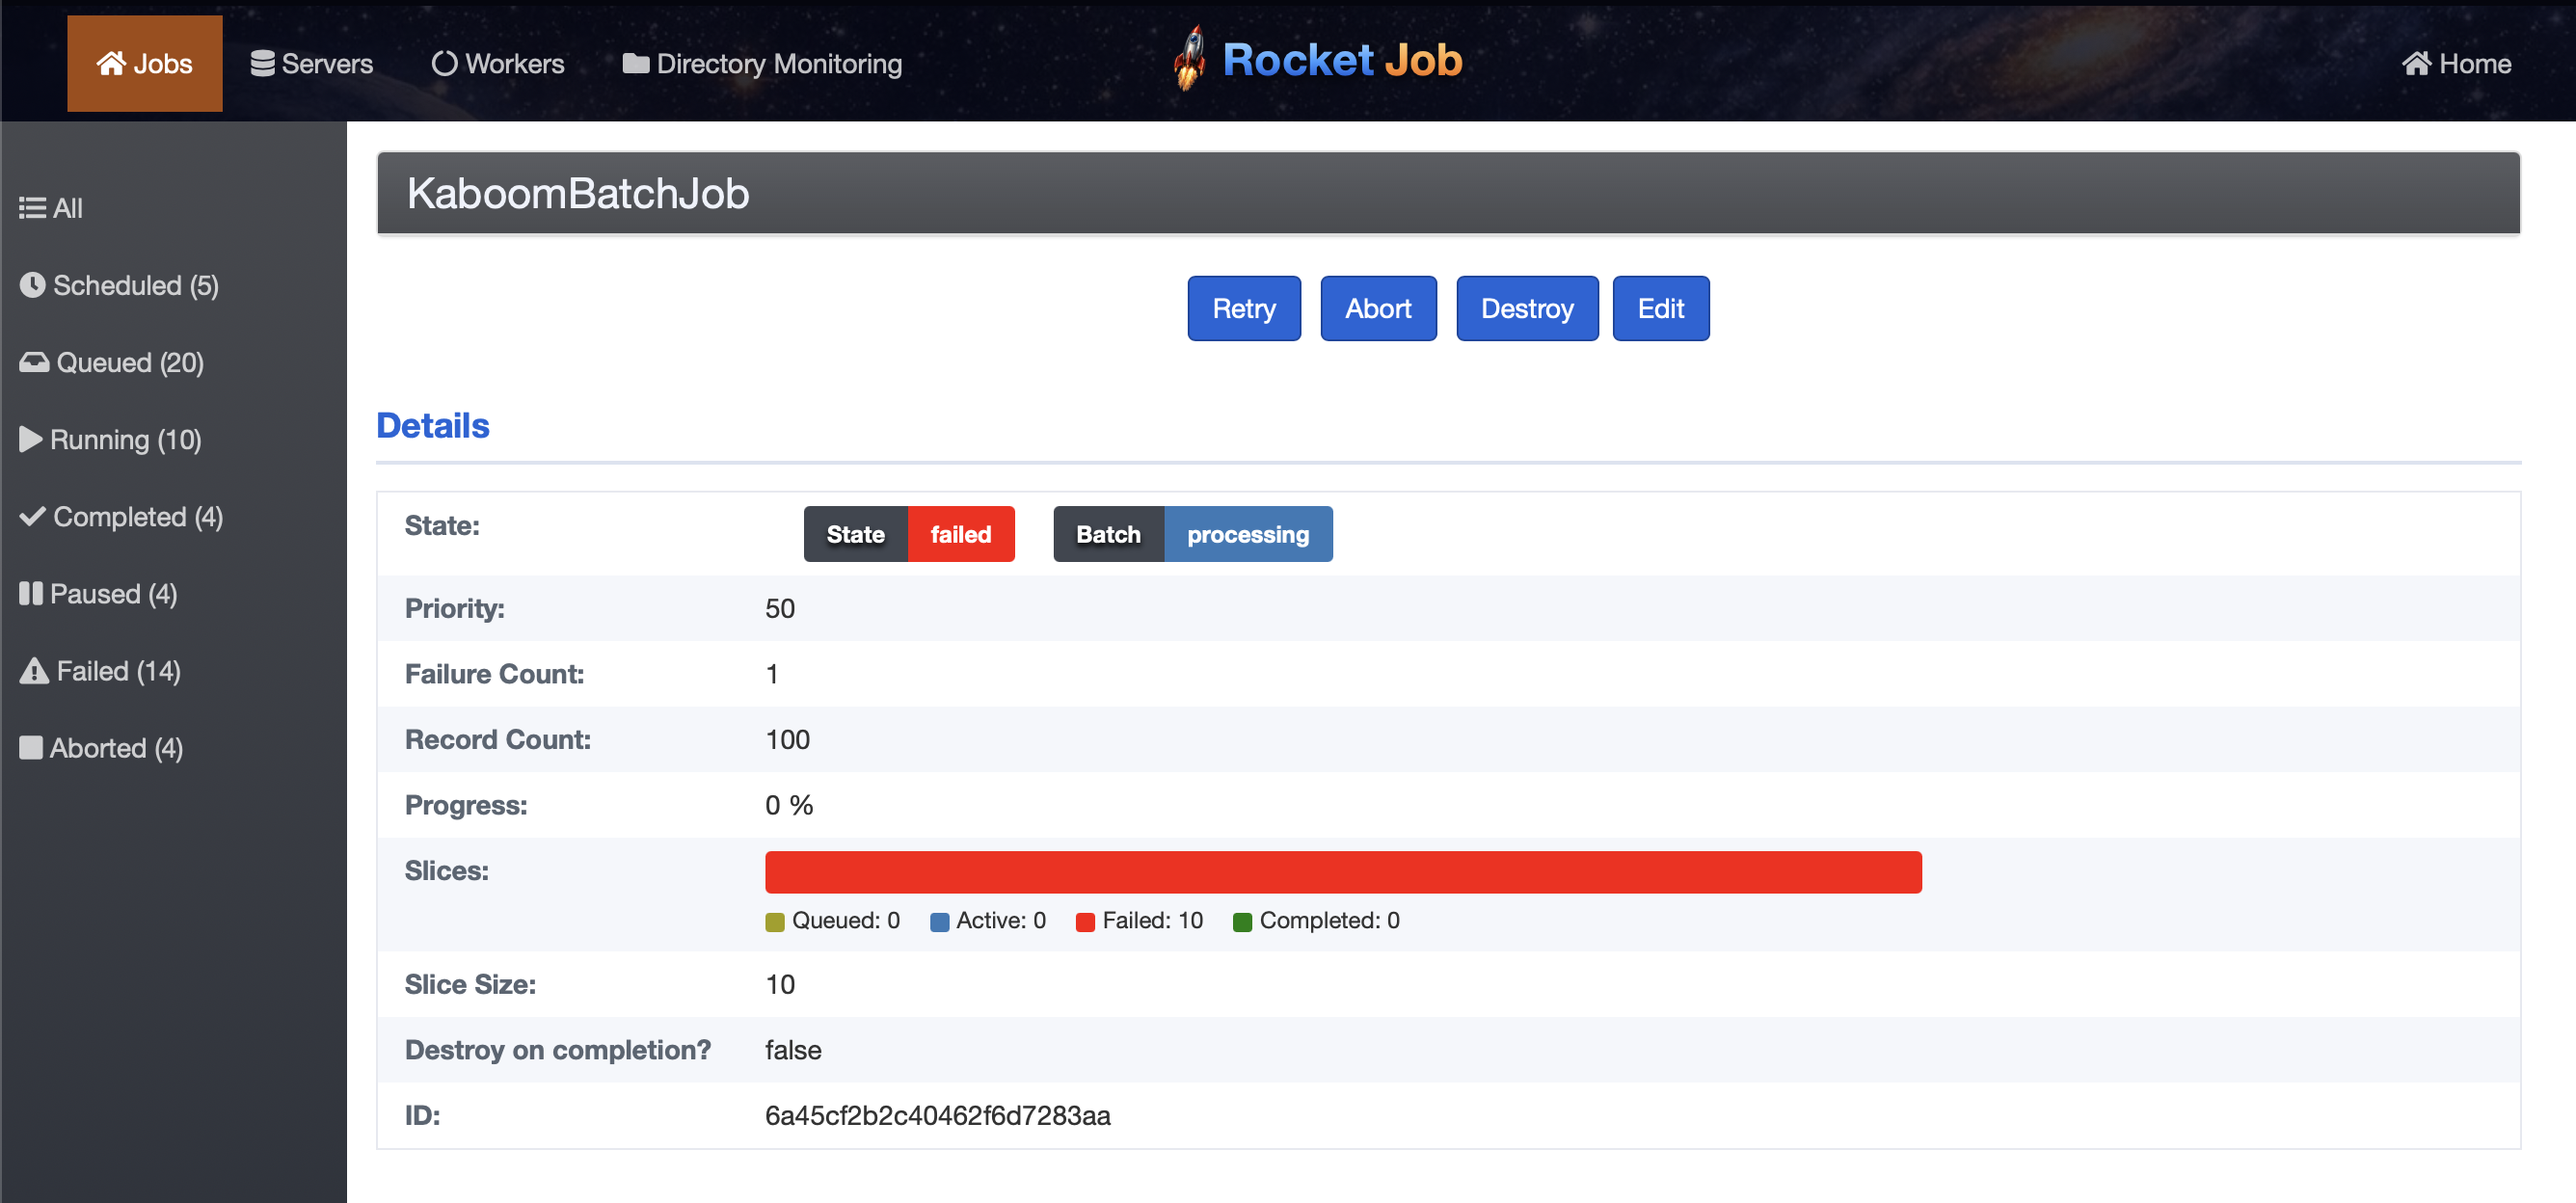
Recovering a failed batch job
When a batch job fails, the problem is often a handful of bad records rather than the whole data set. Because each slice fails independently, Mission Control lets you find the offending records, fix or remove them, and retry, all without rerunning the records that already succeeded.
The failed job’s detail page includes an Exceptions section that groups the failures by exception class and lists the messages raised. This is the fastest way to tell whether every slice failed for the same reason or for several different ones.
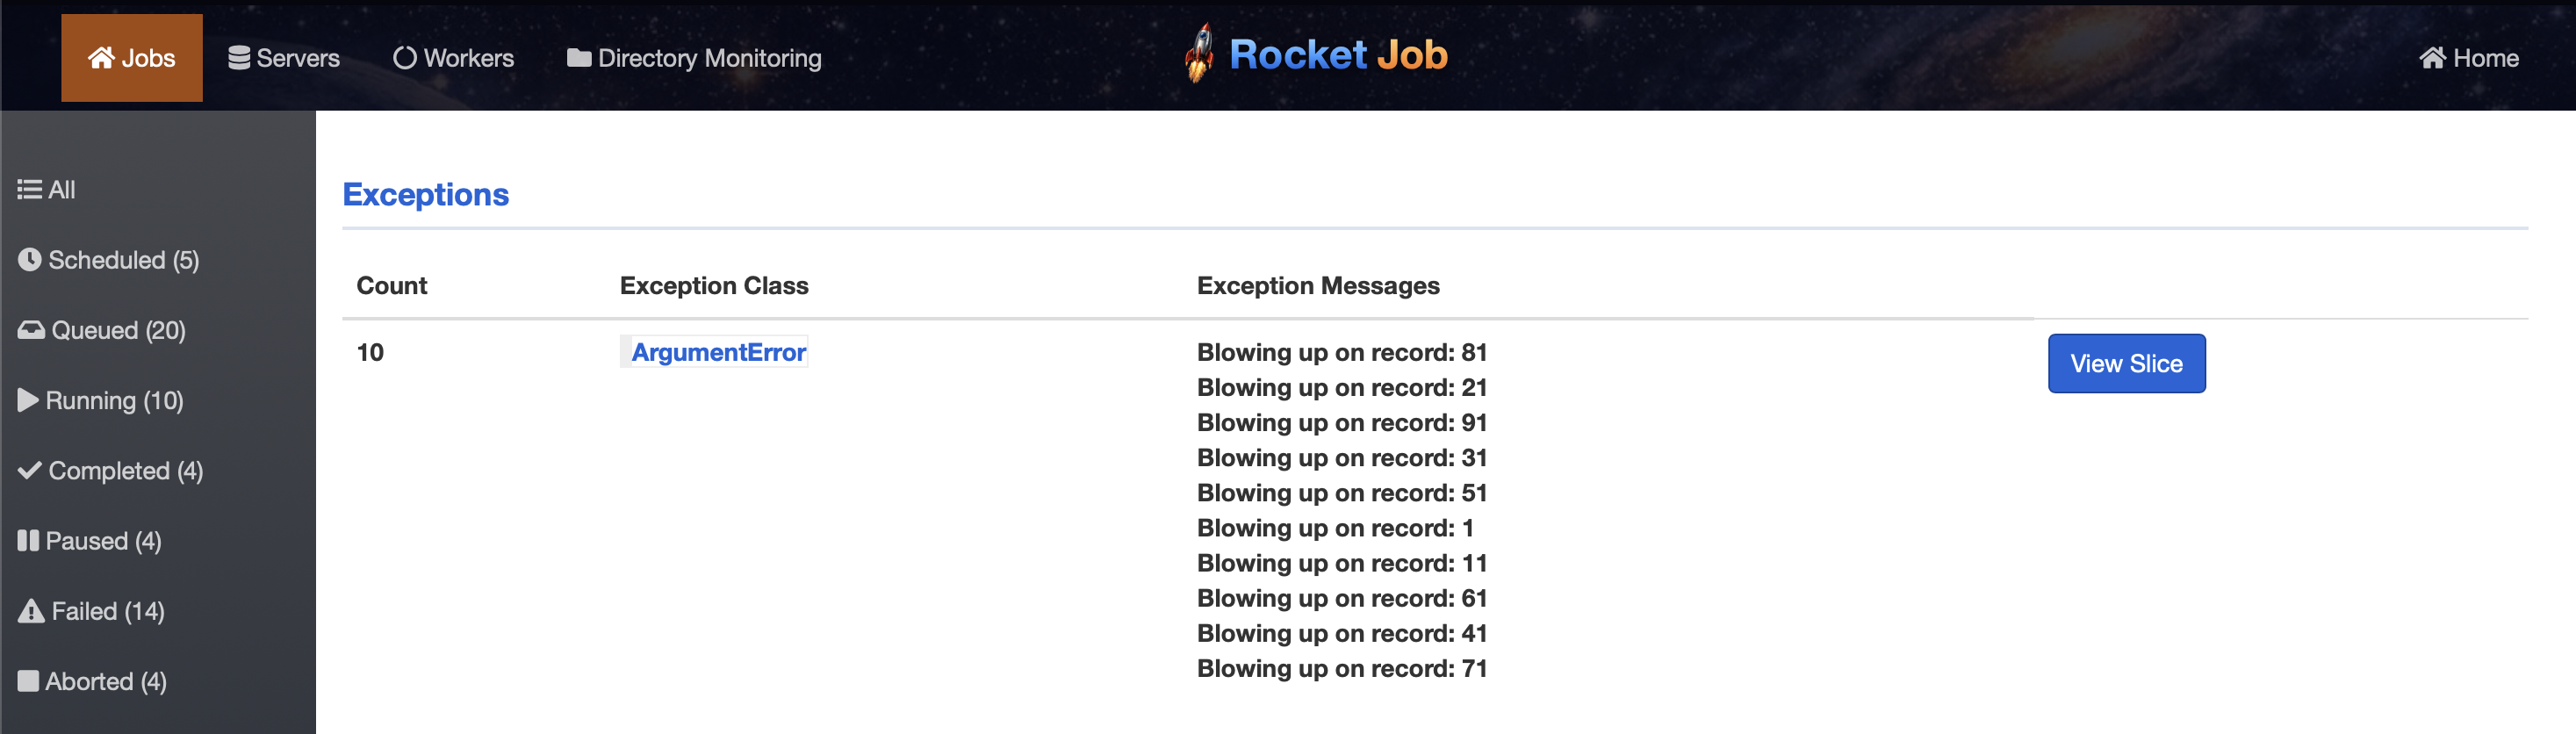
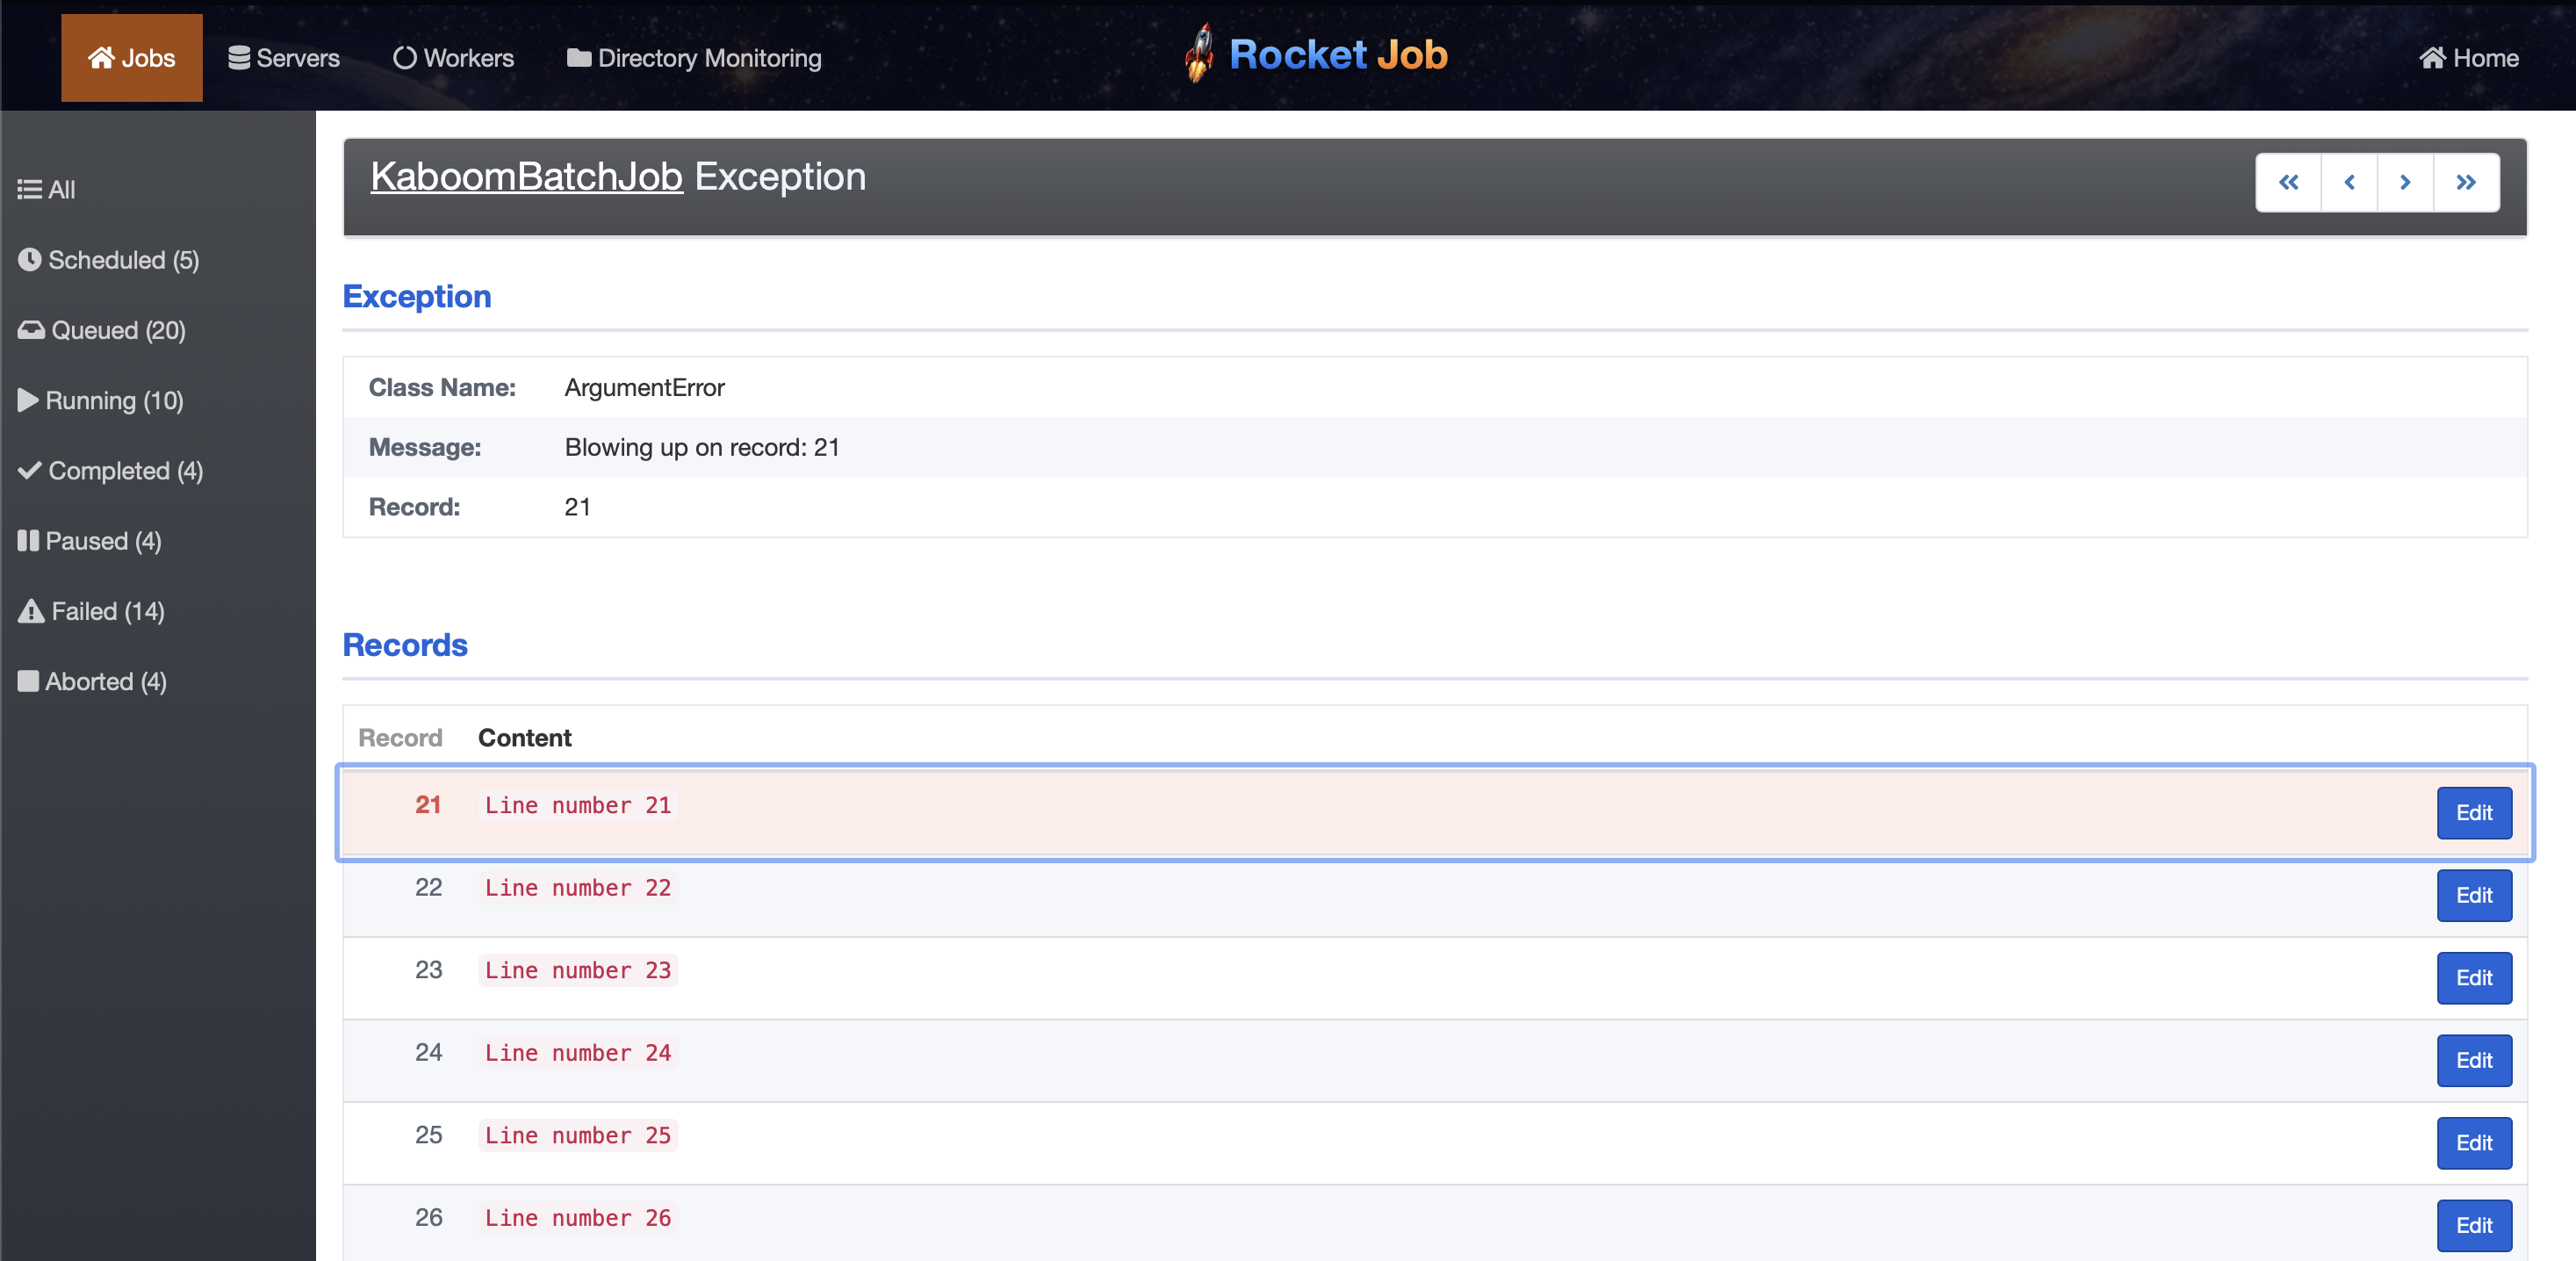
Select an exception class to open its detail page. It shows the class name, message, and the record number that triggered the failure, along with the backtrace (with a Full Backtrace toggle for the complete stack). The arrows at the top step through the other failed exceptions on the job.
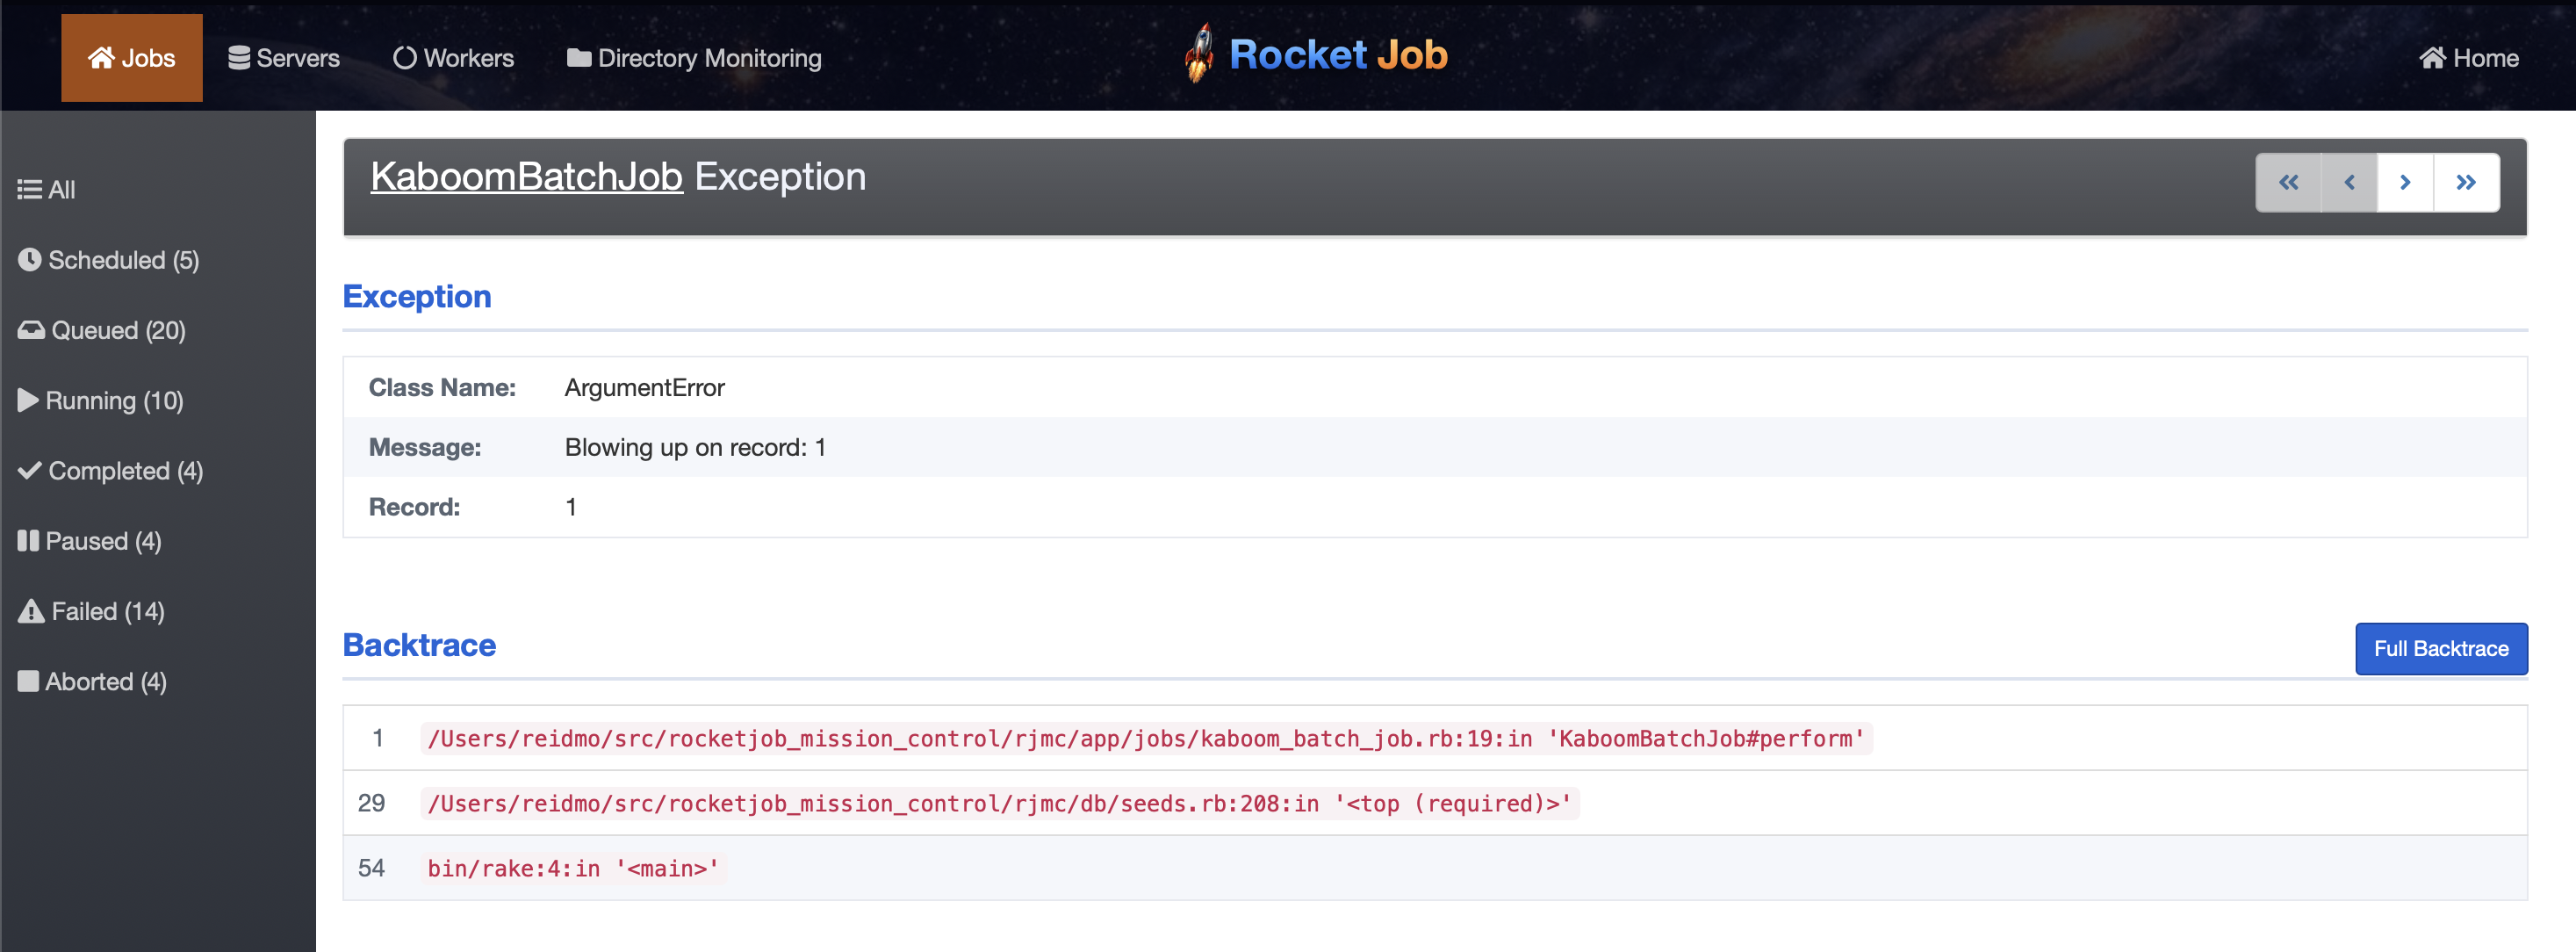
Select View Slice to see the actual records in the failed slice. The record that raised the exception is highlighted, and every record has an Edit button.
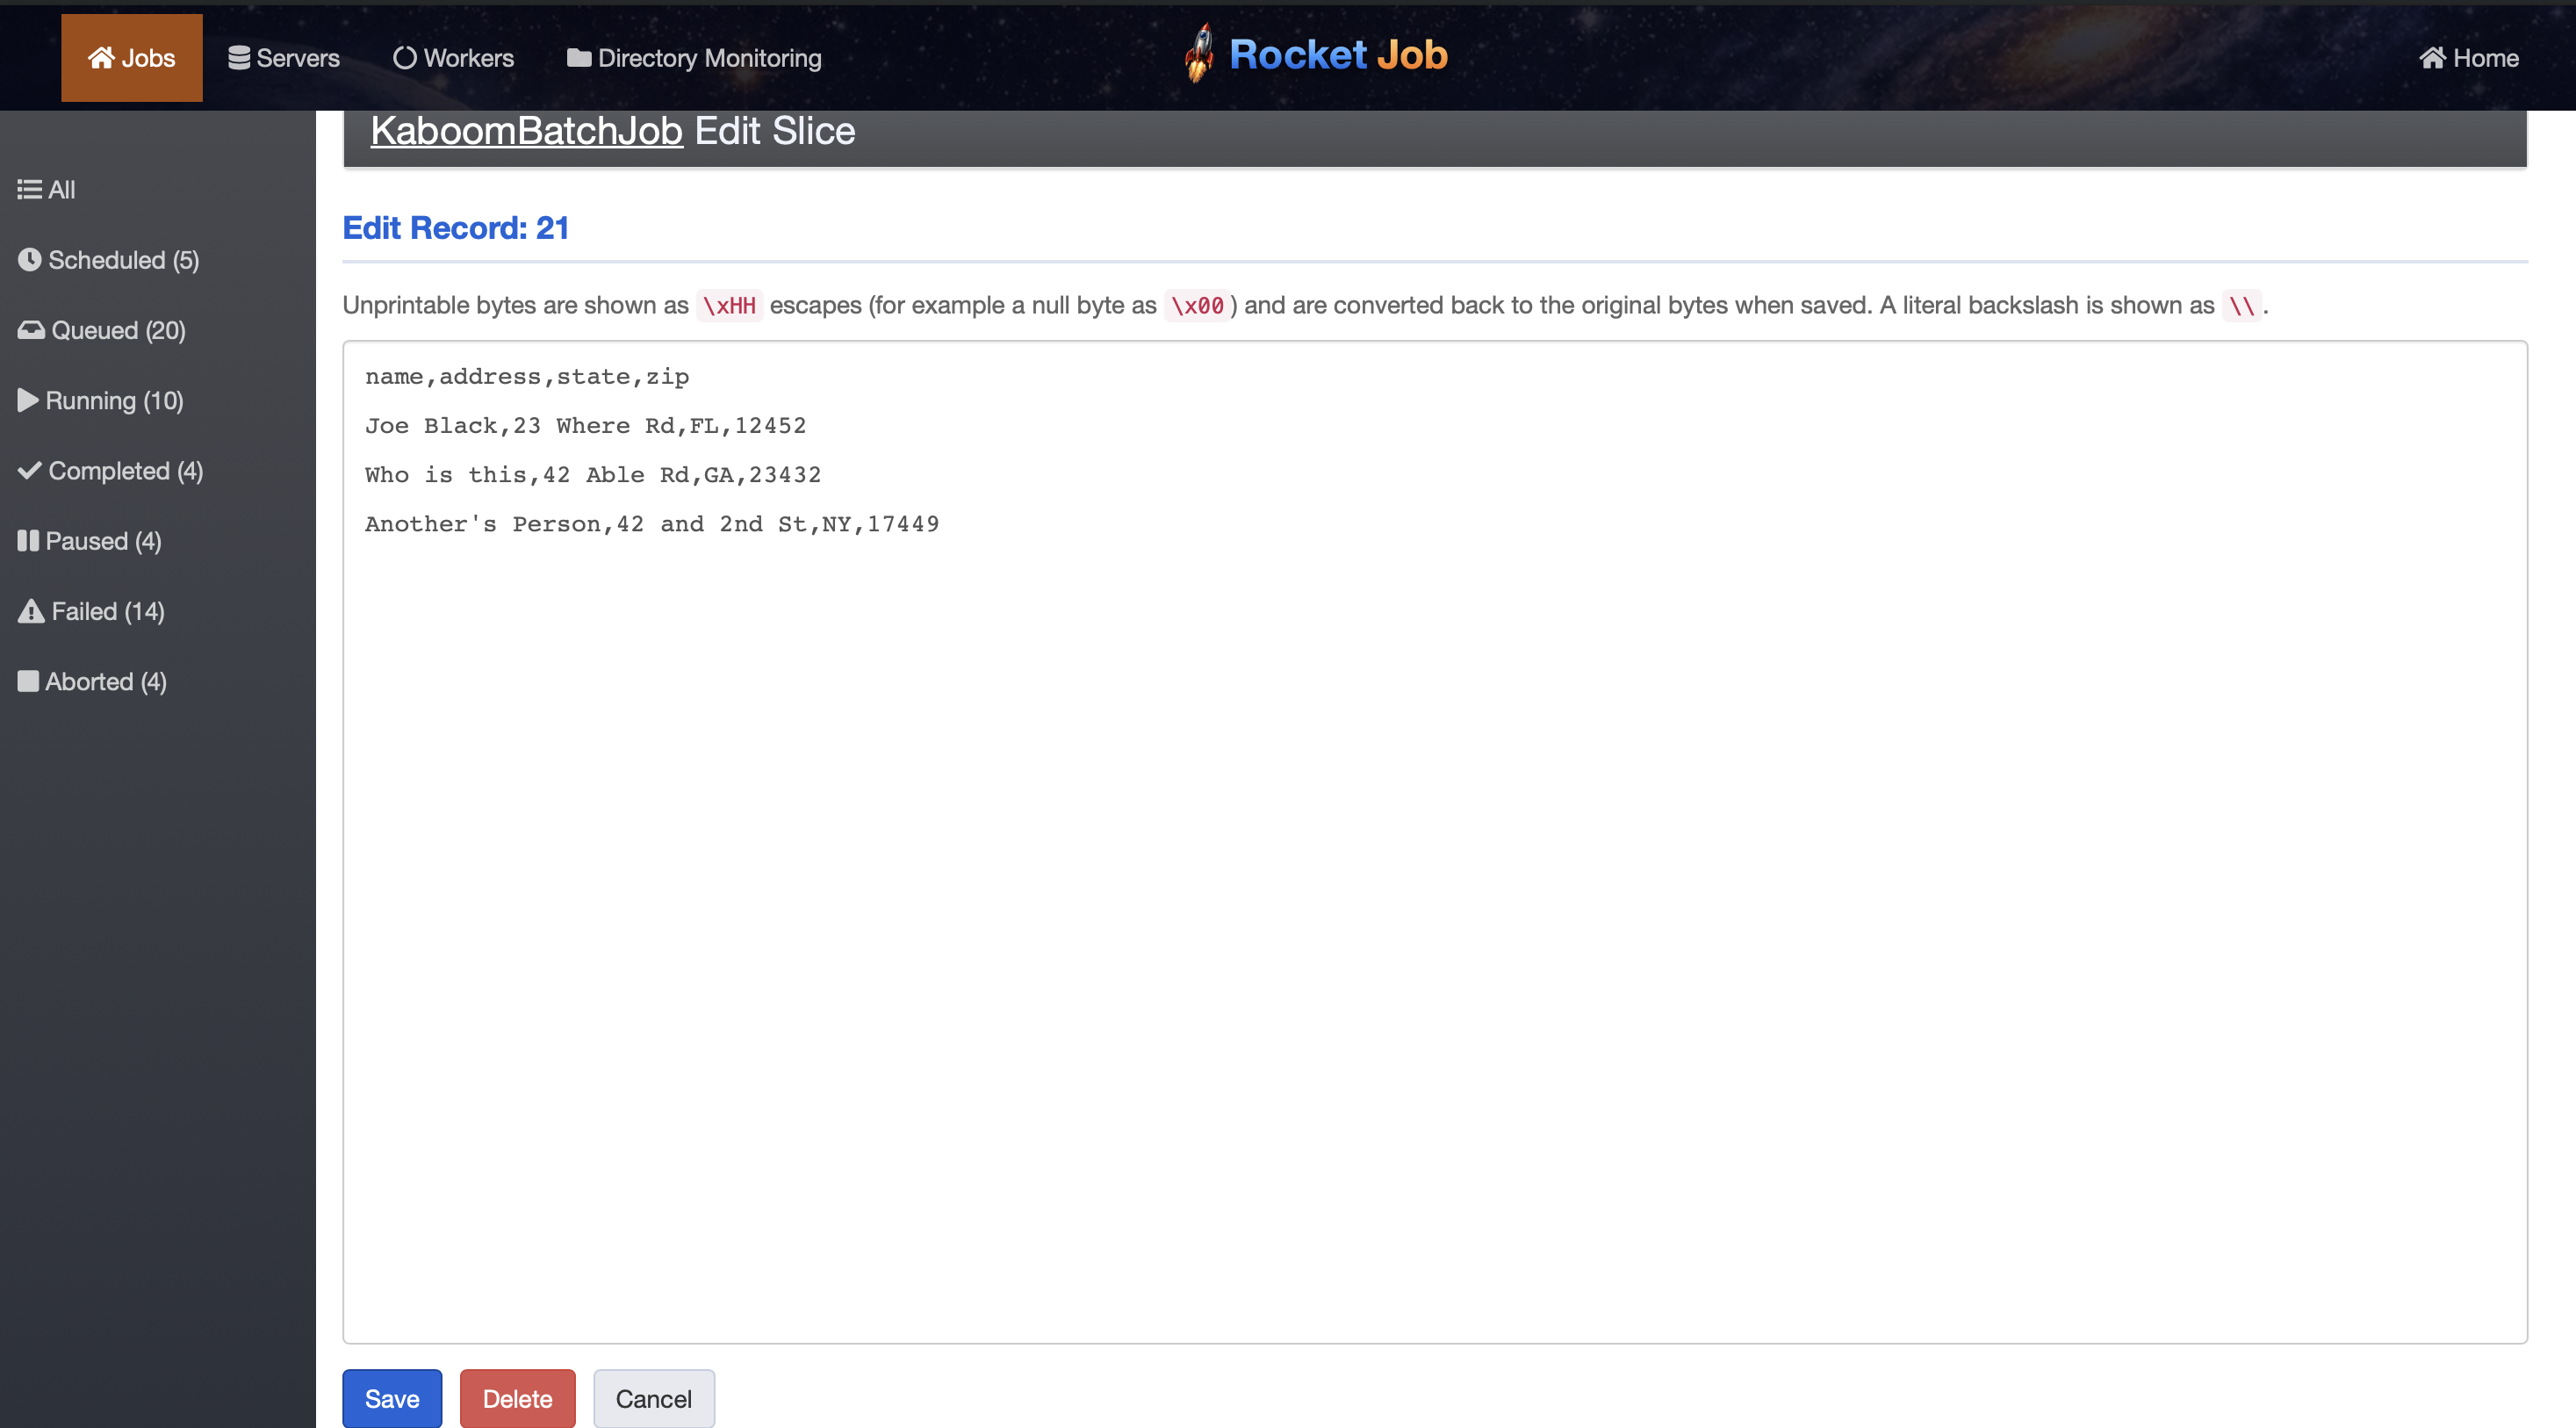
Editing a record opens it in a text area. Correct the data and select Save to put the
repaired record back into the slice, or select Delete to drop a record that should not
be processed at all. Unprintable bytes are shown as \xHH escapes (for example a null byte
as \x00) and are converted back to the original bytes when saved, so binary and oddly
encoded data can be edited safely.
Once the bad records are fixed or removed, Retry the job. Only the previously failed and unprocessed slices run again, so the job finishes without redoing the records that already succeeded.
Monitoring workers
The Workers view lists every active worker across the cluster and the job each one is
currently processing. Each row shows the worker name (in hostname:pid:worker-NNN form), the
job class it is running (linked to that job), the job’s description, and how long the worker
has been on its current work. It is the quickest way to see whether the cluster is busy and
where its capacity is going right now.
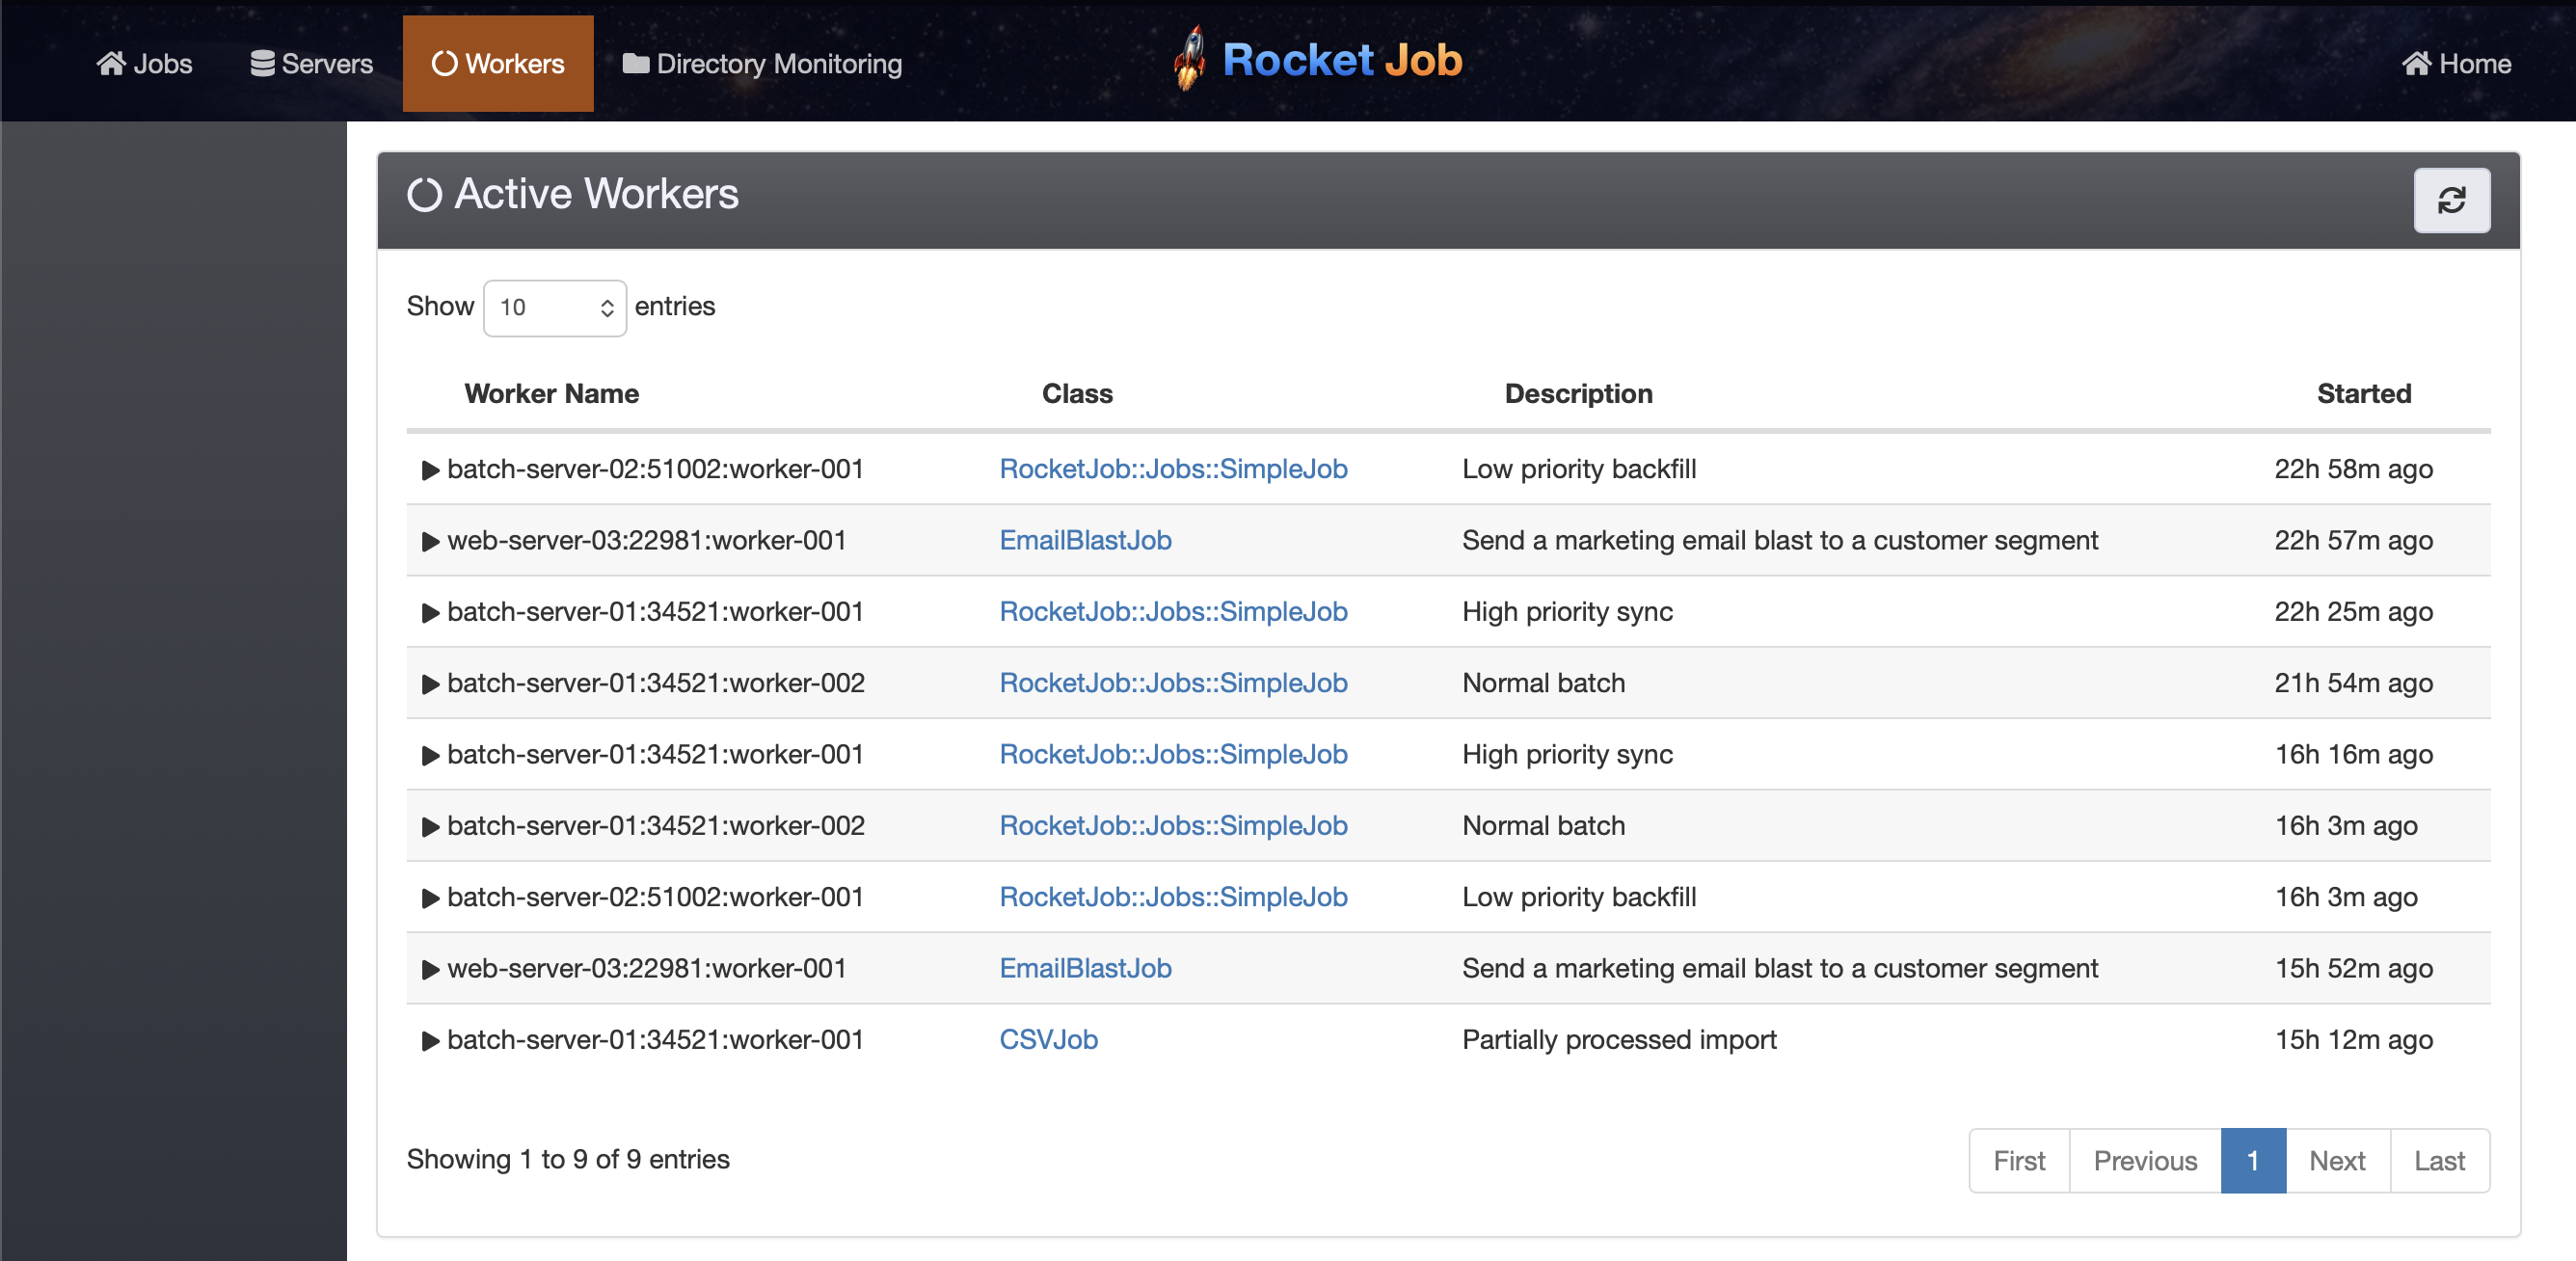
Because a single server runs many workers, the same server name appears on several rows when it is processing several jobs at once. Use the refresh control at the top right to re-read the current state.
Managing servers
The Servers view lists the running Rocket Job server processes (each Server is one
running process; see Architecture), grouped in the sidebar by state:
starting, running, paused, stopping, and zombie. Each row shows the hostname and PID, the
current and maximum worker counts, when the server started, and when it last checked in.
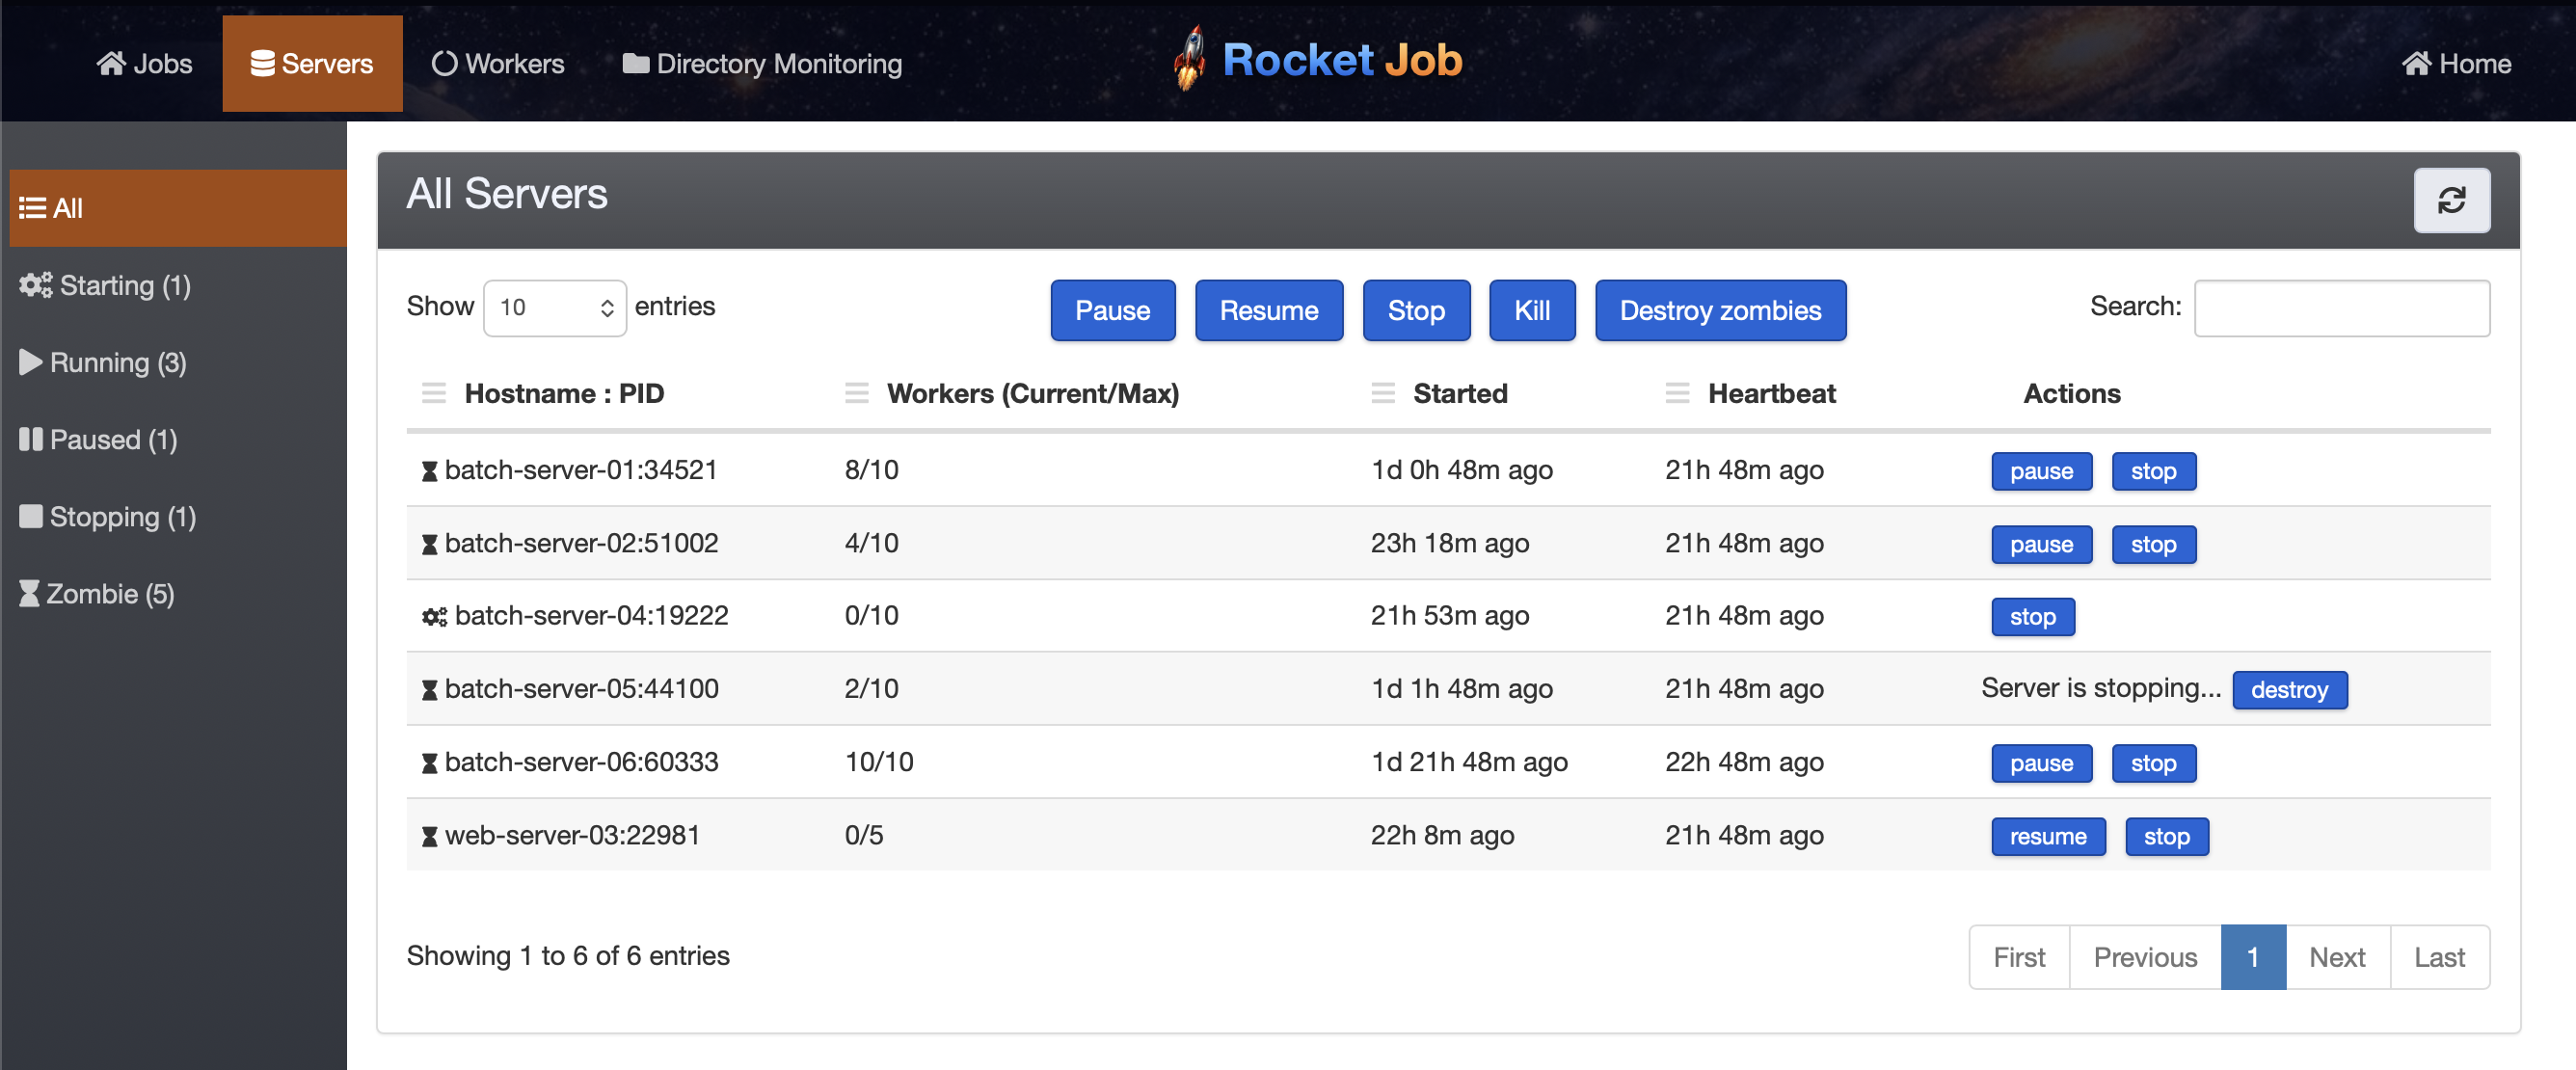
Servers can be controlled from here without shell access to the hosts:
- Pause / Resume an individual server to stop or restart it pulling new work.
- Stop an individual server to shut it down gracefully.
- Pause All, Resume All, and Stop All apply the same actions to every server at once, which is useful for draining the cluster before a deploy and bringing it back afterward.
These actions are delivered to the servers over Rocket Job’s MongoDB-backed pub/sub mechanism, so they take effect across every process in the cluster without a separate message broker.
Zombie servers
Every server writes a periodic heartbeat. A server that stops checking in, usually because its process was terminated abnormally rather than shut down gracefully, is flagged as a zombie so dead processes can be spotted and cleaned up.
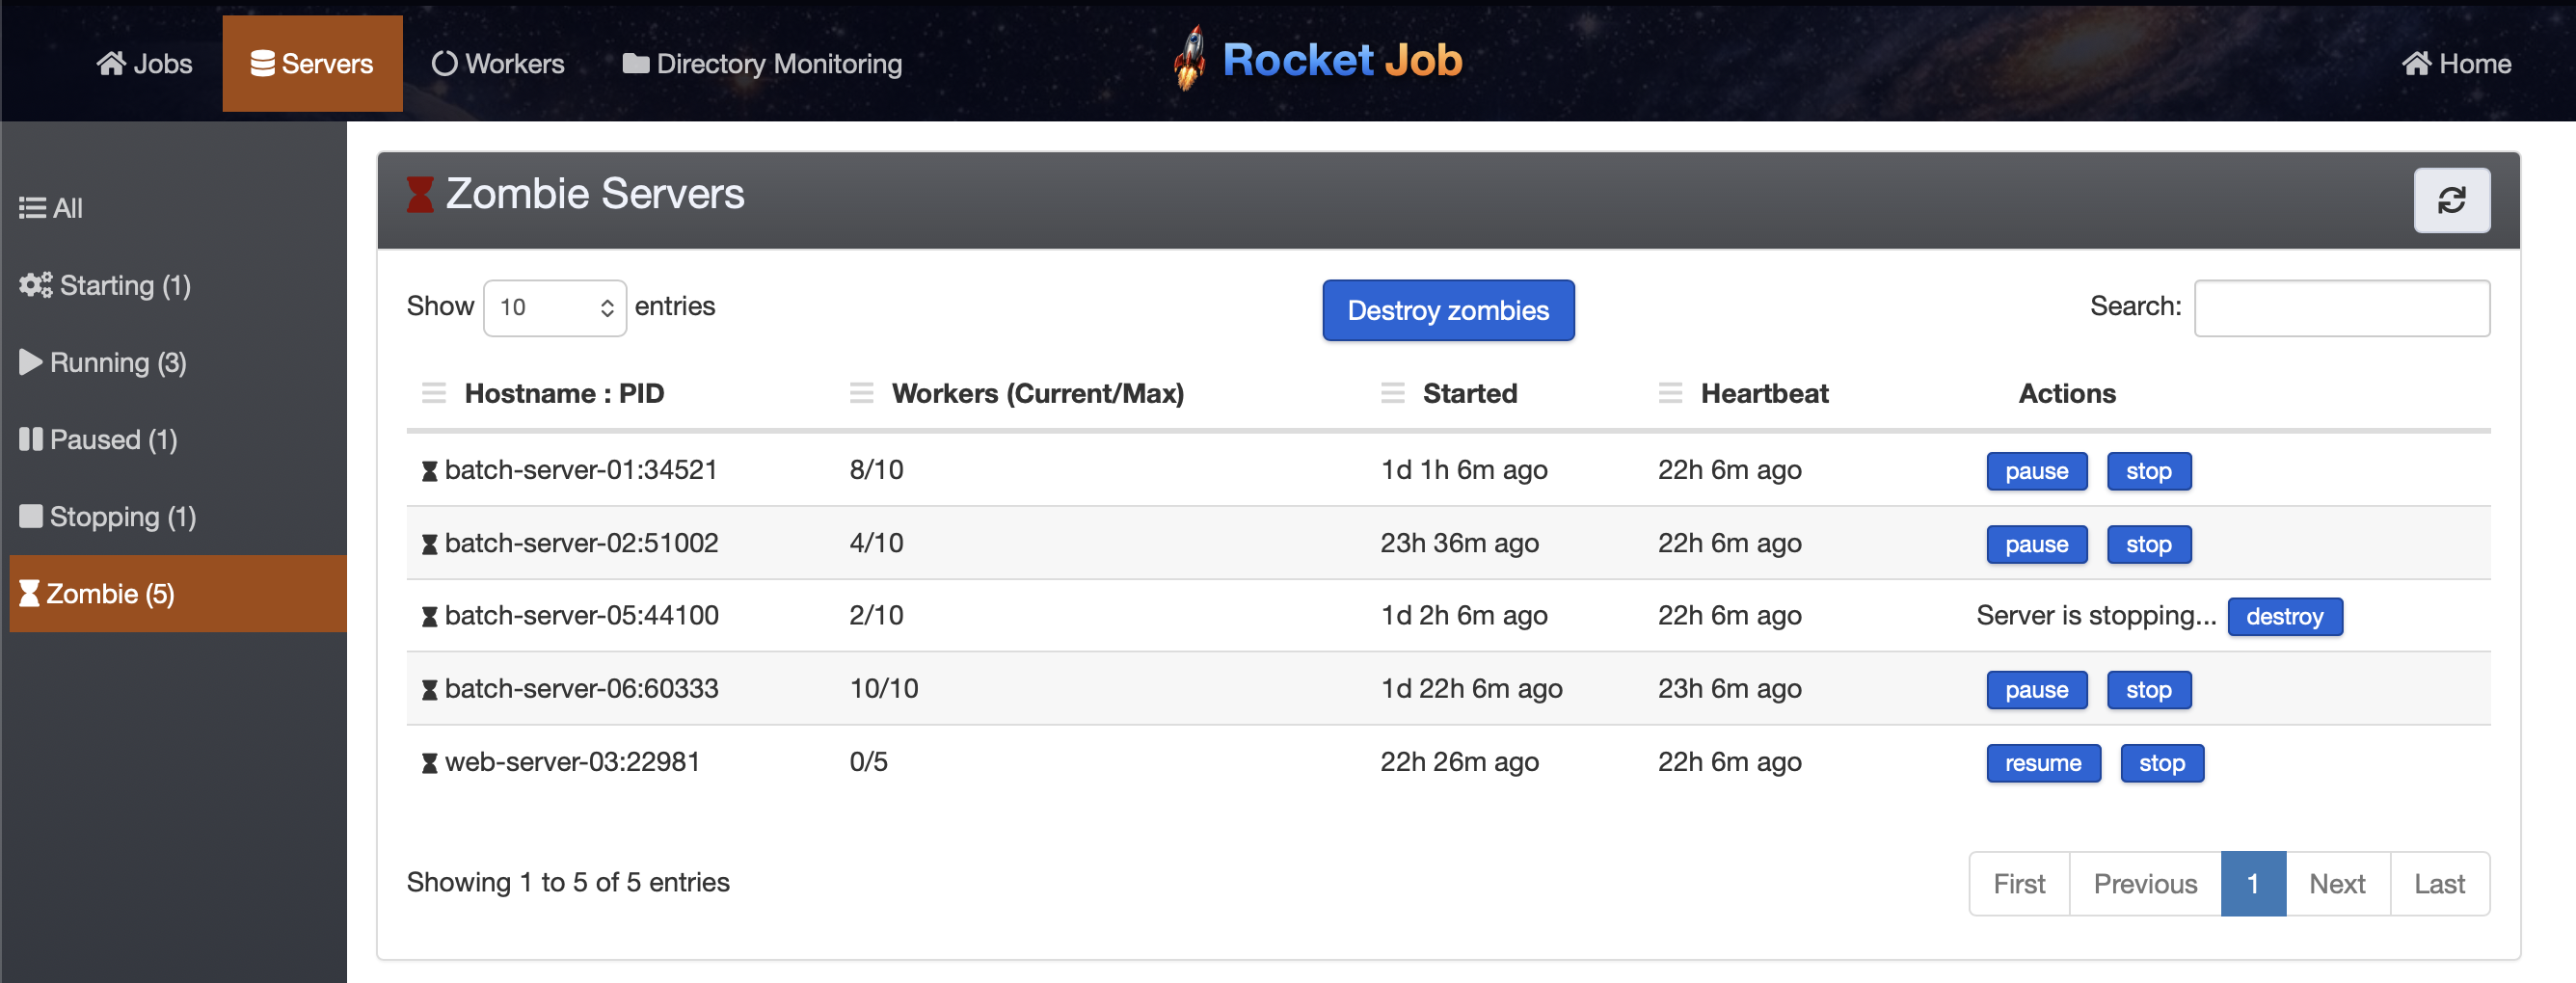
Zombies matter because a job that was being processed by a server that died would otherwise
sit stalled. Rocket Job’s HousekeepingJob watches for zombie servers and re-queues any jobs
they were processing so another worker can pick them up. You can also clear them by hand:
Destroy zombies removes all of them at once, or use the per-row action to destroy a
single one.
Managing directory monitors
Mission Control includes a full management screen for Dirmon, Rocket Job’s directory monitor. A Dirmon entry watches a path pattern and starts a job whenever a matching file appears, so the files and schedules a system reacts to can be changed from the web UI without a code deploy.
The Directory Monitoring view lists every entry with its name, job class, and the file pattern it watches. Entries are grouped in the sidebar by state (pending, enabled, failed, disabled), and each entry’s name is colored and icon-tagged by its state.
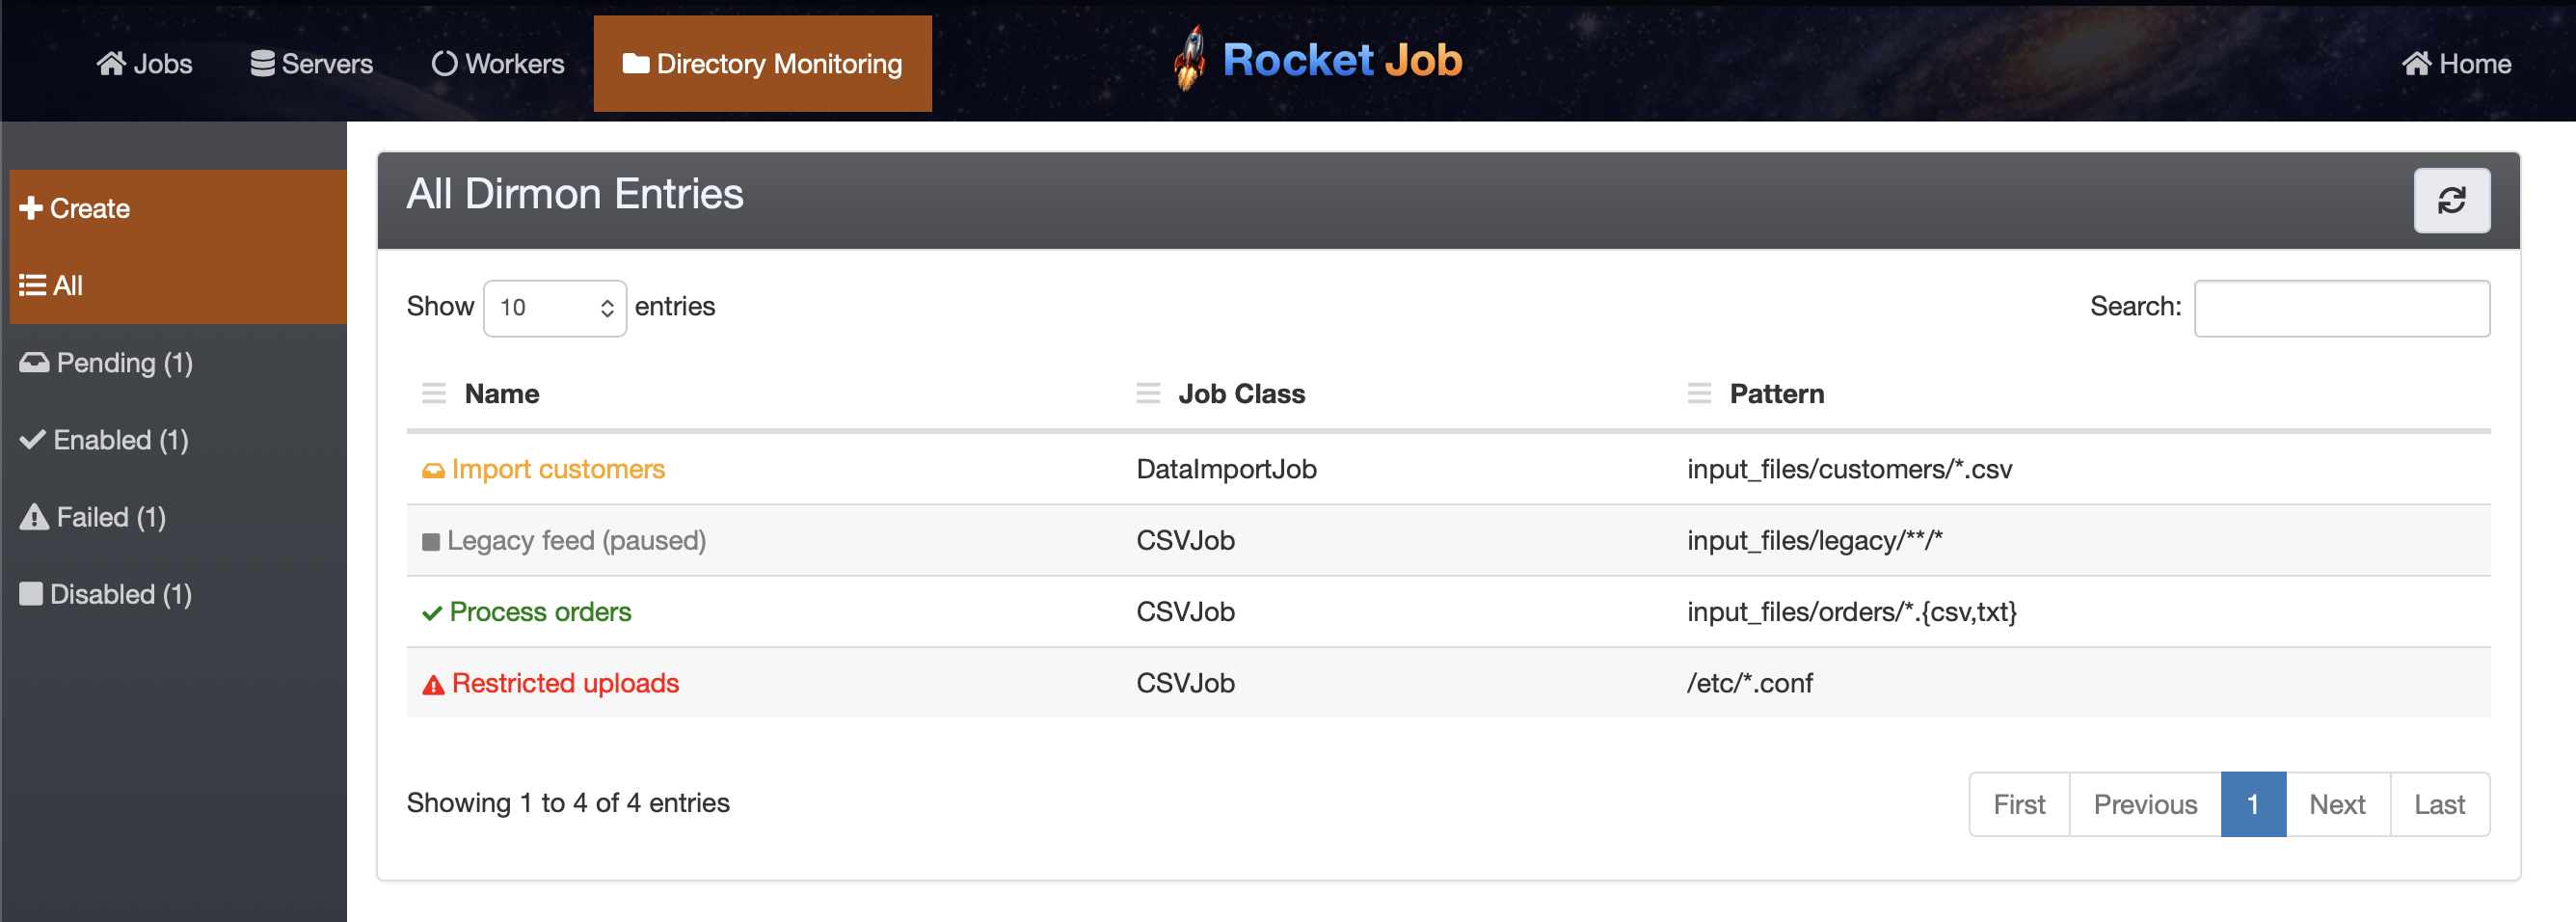
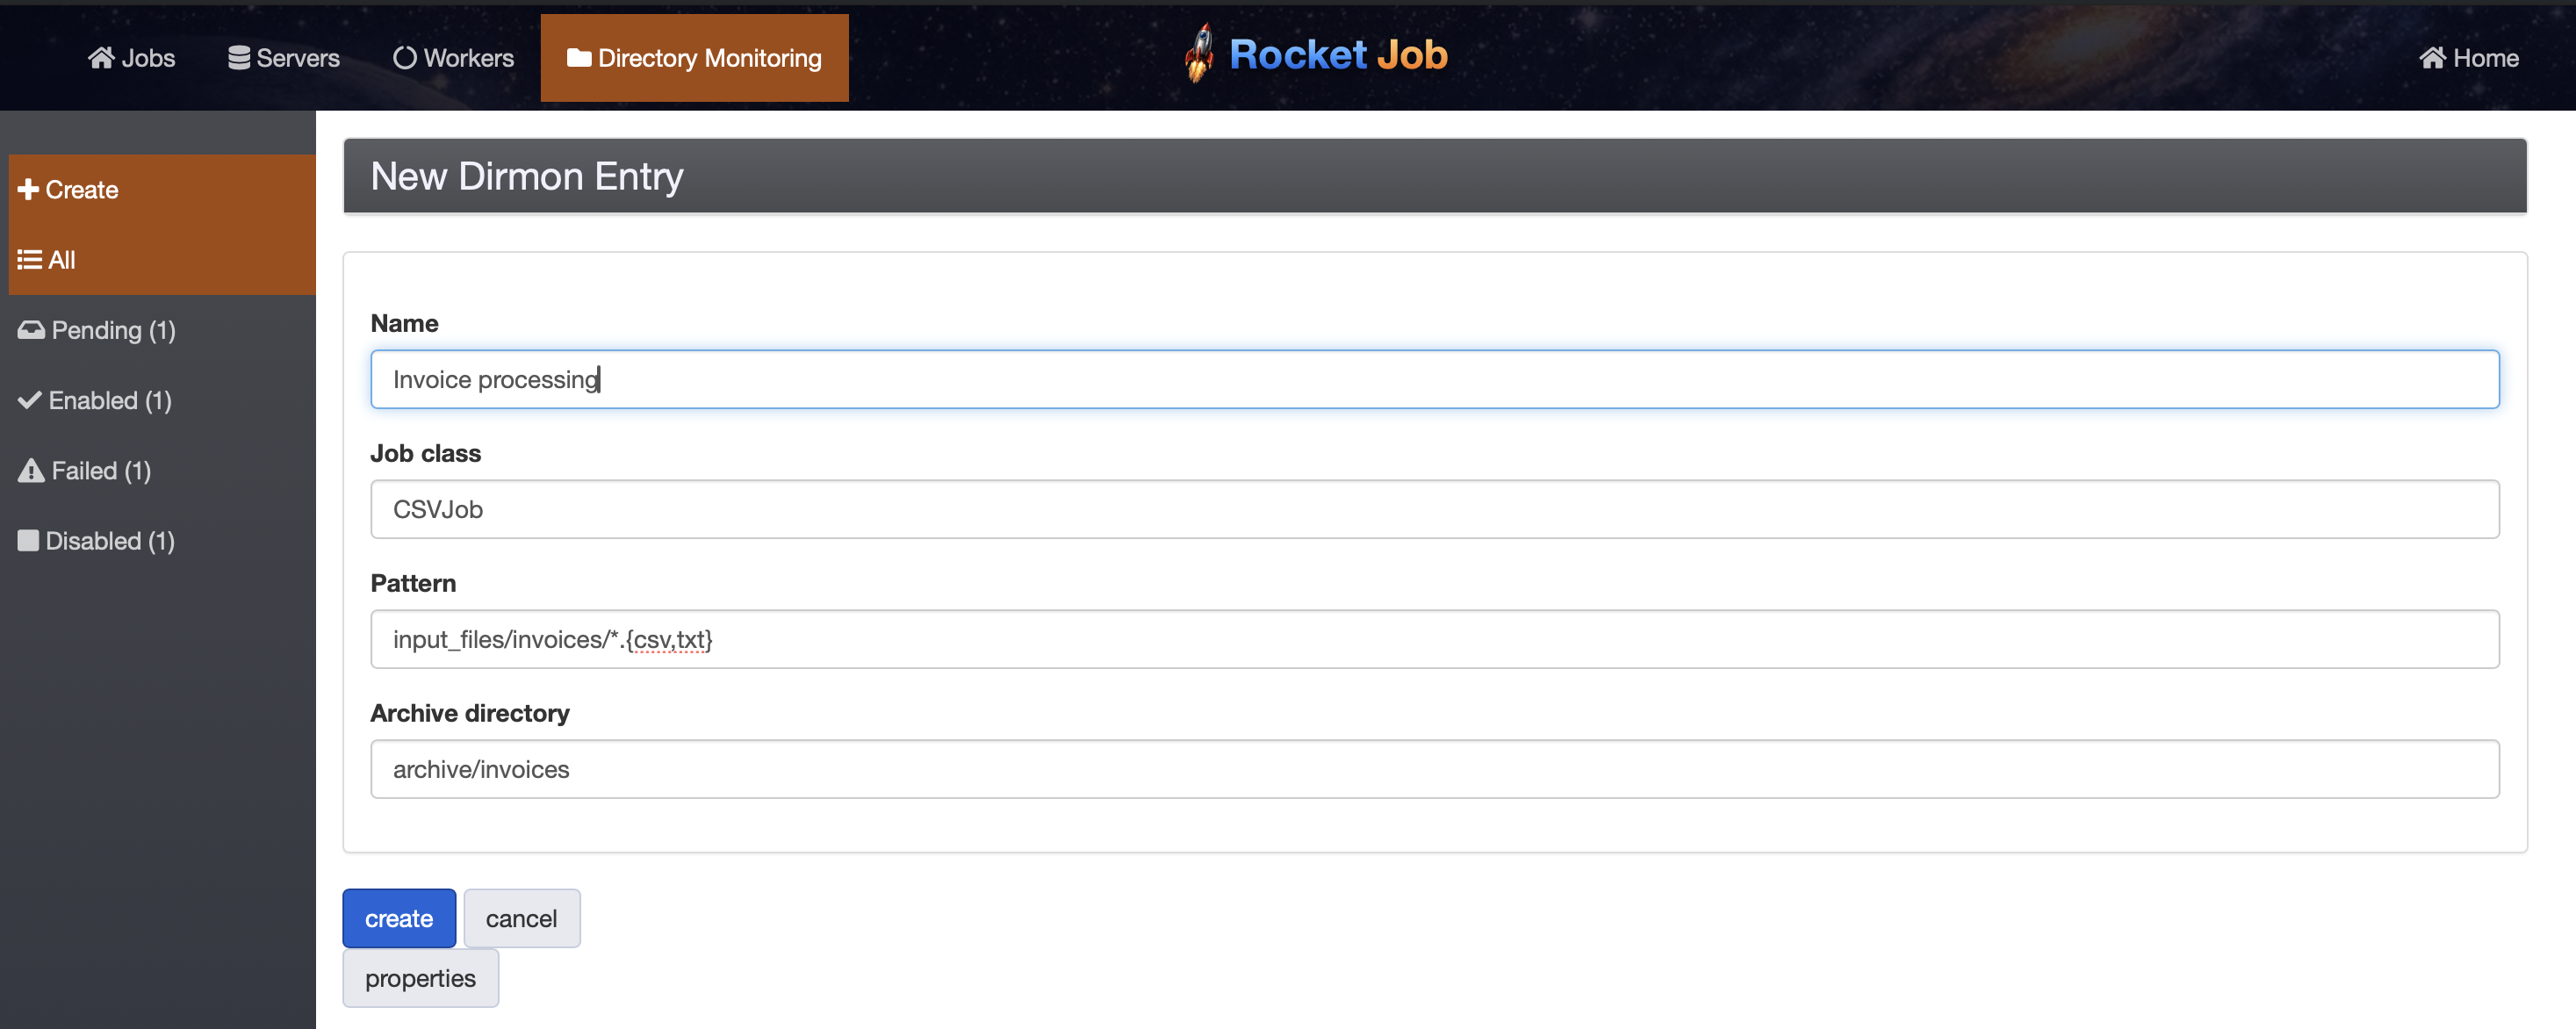
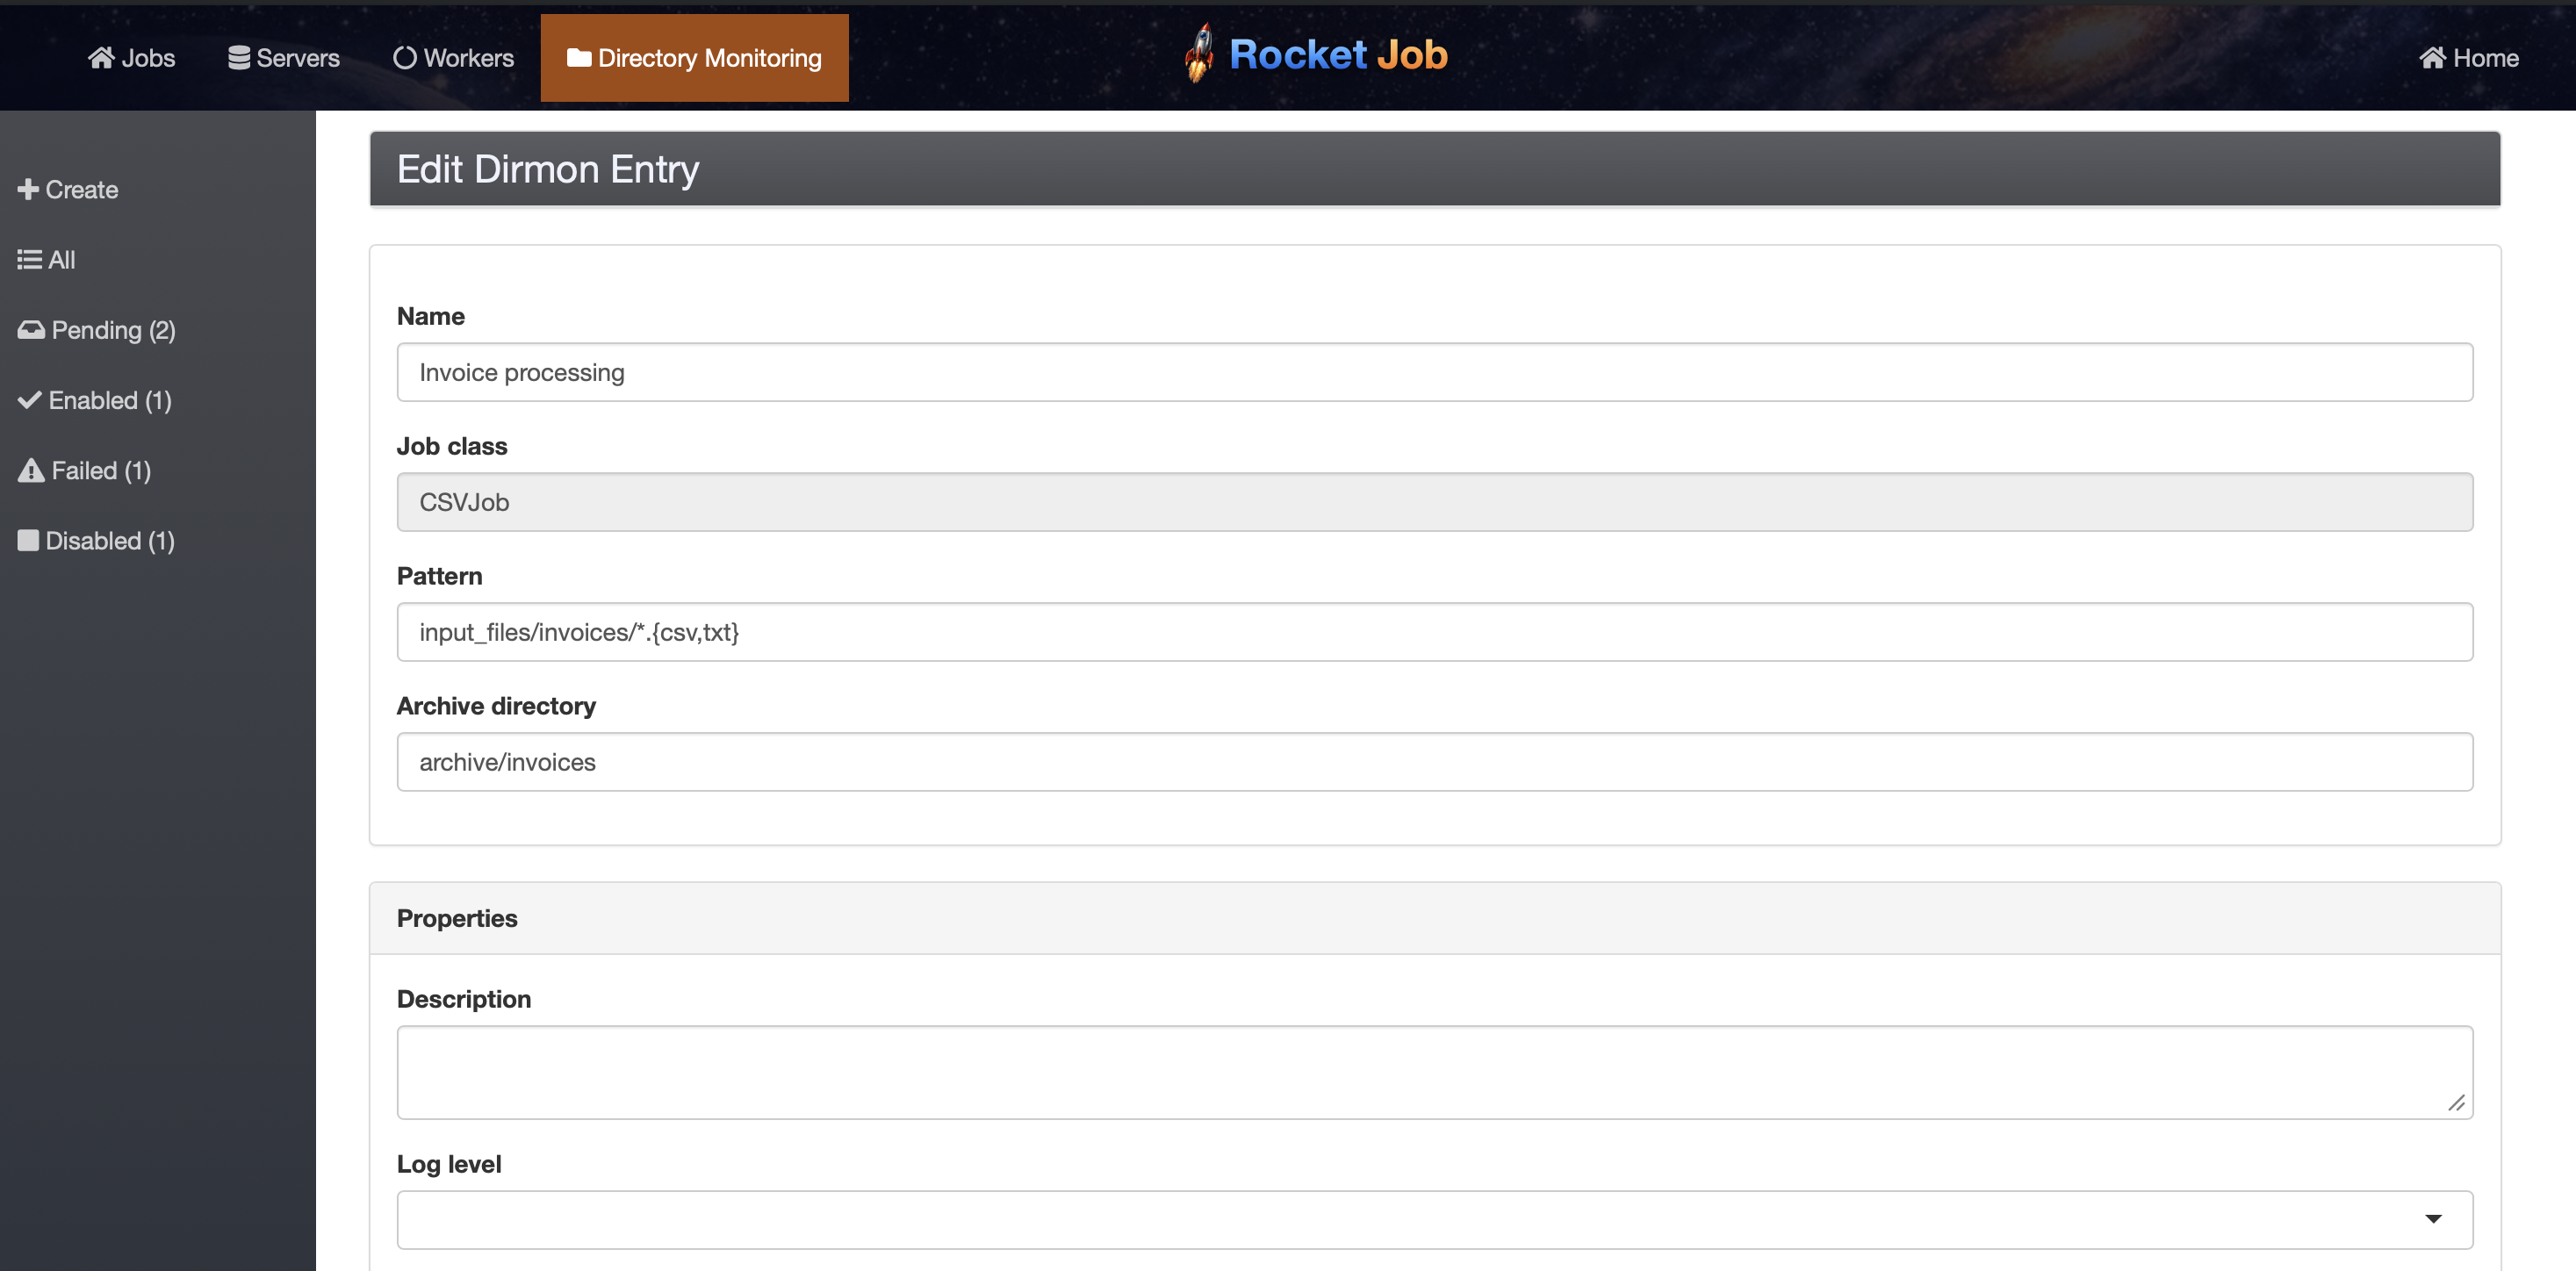
Select Create to add a new entry. At minimum an entry needs a name, the job class to
start, and a pattern (a glob such as input_files/orders/*.{csv,txt}) identifying the files
to watch. An optional archive directory tells Rocket Job where to move each file after it has
been queued. The properties button reveals the job’s own fields so their default values
can be set on the entry.
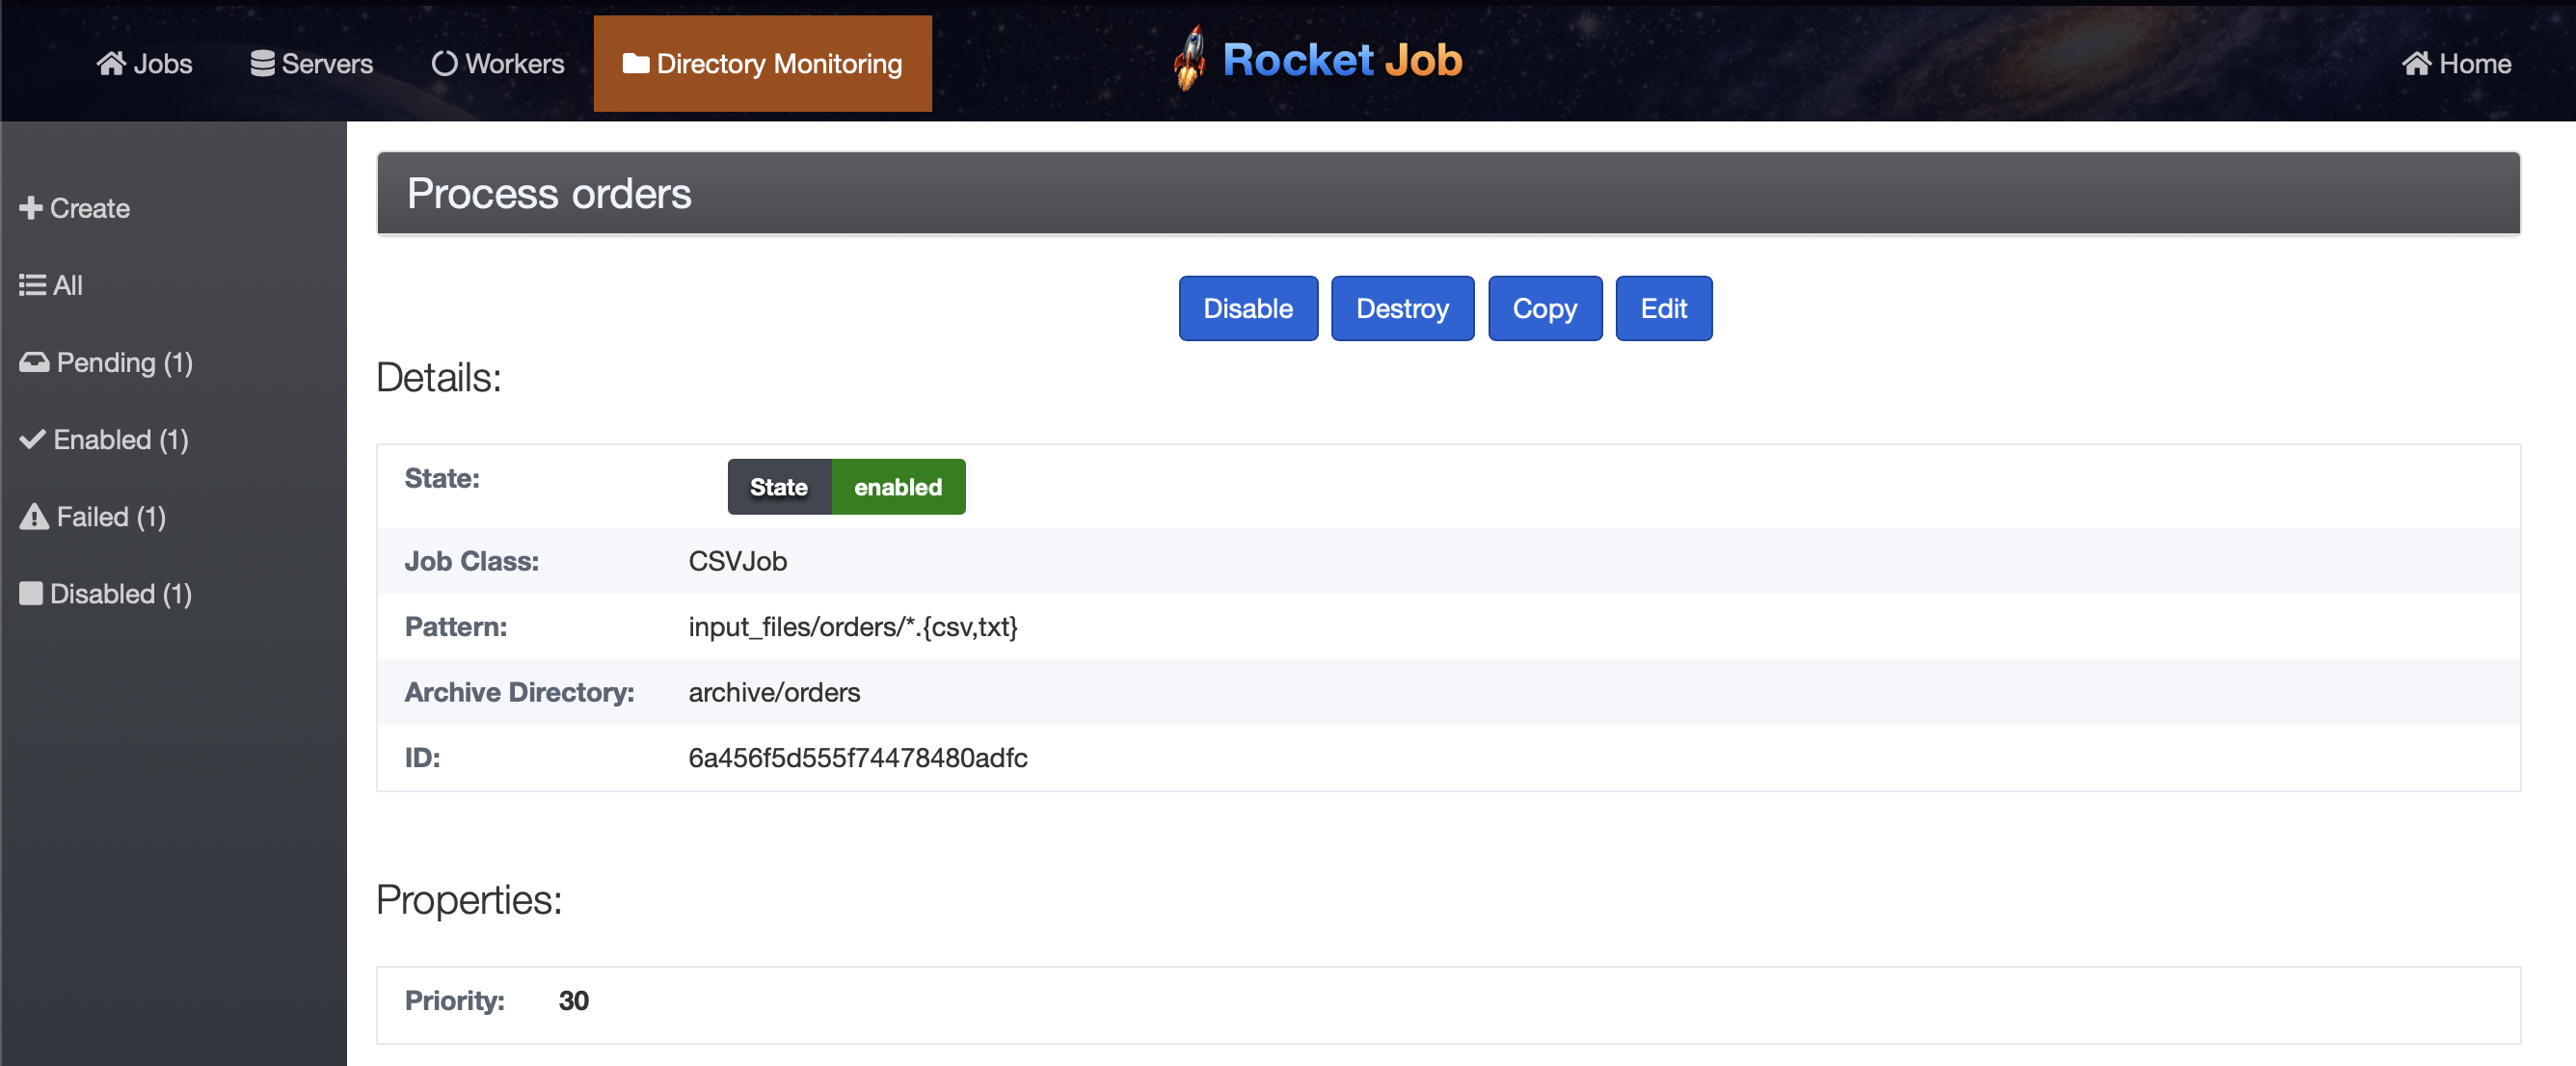
Selecting an entry opens its detail page, showing its current state, job class, pattern, archive directory, and any job properties. From here an entry can be enabled or disabled, edited, copied to a new entry, or destroyed.
Editing works the same way as creating, on the same form. A failed entry, one whose last run raised an error, can be corrected here and re-enabled in place.
See the Dirmon guide for what each field controls and how patterns and archiving behave.